Sunday, September 30, 2012

Teaching Manuals

Hi Everybody... Robin here.

Just finished creating my Teaching Manual for Flowers in a Vase (ND 311), and thought you might like to see what is involved.

First of all, why do I create a Teaching Manual?

  • Present the project to the class with all details and sequences at hand.
  • Showcase for some "behind the scenes" photos.
  • Good review of the how/when/where/whys of the project prior to teaching.
  • It is kind of like art project, and you know how I like art projects!

First, I write the Stitch Guide. This is a typed document describing each area in detail: the stitch, the threads, and the sequence of stitching. Charted diagrams are included for each area.

Screenshot of Flowers in a Vase (ND 311) stitch guide

When I begin the Teaching Manual, I use the exact text from the Stitch Guide. Each area is on its own page with the font size increased so I can comfortably read and refer as needed. The Thread types are in Red for easy reference. The same Charted diagram from the Stitch Guide is on the page, too... enlarged. 

Screenshot of Teaching Manual for ND 311

A work in progress photo is also included so the students can see what I experienced when stitching the model.

Now everyone sees the backside of my stitching... Yikes!

Once the Teaching Manual is complete, I put each page into a Premium Heavyweight Sheet Protector from Avery (affordable at Costco, bundled 250 sheets per box). 

Protective Sheets are so much fun.

And then, each sleeved page goes into a 3-ring 1" Binder. (Again, from Costco; bundled in 6 per group.) I really like this binder with clear sleeve on the front and spine so you add a descriptor page. Let the art project begin!

In Photoshop, I make the Teaching Manual cover art: Canvas Name, Designer, Number, my info, and finished photo. 

Cover Art for ND 311

There is the Spine art, too.

Spine Art for ND 311

Put all of the sleeved pages and the Cover/Spine Art into the Binder, and call me happy!

Blog readers who have been with me know I have done this procedure for each teaching endeavor.

Earlier teaching/stitching moments.

The Creepy Characters demanded their own Manual.
The Teaching Manual library continues to grow...

Recent and current teaching/stitching projects.

The art project is finished.

Did someone say photo shoot? Here's Leo...

Leo checks out the layout.

Well, it is time to print the Stitch Guides... I'll be at The Bristly Thistle (ND 311) real soon. The Needle Bug (ND 309) and The Nimble Needle (ND 311) soon after that. October is going to be a fun month. Hope to see you there!

Until the next time... Hugs, Robin

Thursday, September 27, 2012

Be sure to first Meet and Greet your Framer

Hi Everybody... Robin here.

Finally! The Flowers in a Vase (ND 311) is finished; my newest teaching piece for these needlepoint shops:


Hopefully, for more shops, too, as there are many "teachable" moments on this canvas. I embraced new techniques, and, if it is new to me... it might be new to you, too.

Any Needlepoint Shops or ANG groups interested? Just let me know...


Flowers in a Vase • ND 311 • NeedleDeeva
Canvas comes with Stitch Guide by Robin King

On September 15, I brought the finished piece in for a consultation with my framer. No frame selections were made. Instead, I checked with him to see how much "extra" needed to be stitch; for the frame to sit optimally onto the canvas.

Note this: I prefer to frame my needlepoint without any glass. My framer will mount and stretch the piece. I like the look of the "liners" so I follow the recommendation from my framer. Please, do what is best for your comfort zone. Discuss your preferences with "your" framer, OK?

The framer calculated an extra 3/8" (6 canvas threads on an 18 mesh canvas) needed to be stitched on all sides. If your design is close to the edge of the canvas, this is a must thing to do!!!

I am so glad we had our "meet and greet" because this knowledge prevented any encroachment of the frame into the design area.

In times past, the extra 6 canvas threads were stitched in Basketweave, but lately, I have done a diagonal Satin Stitch (/). Still full coverage, yet, less time involved.

A little breathing room is a good thing.

On September 22, I returned to my framer, T. Clifton Art (Memphis, TN). My mind was blank with expectations and demands. I bowed to his instincts... his experience... his artful wisdom. There were only 2 requests: 
  • for me to pick up this framed piece on October 9th.
  • for the framed piece to fit in my suitcase box which is what Sunflowers and Berries (ND 309) currently travel in.
(It is probably silly, but that box can make/break my travel accommodations. LOL.)

Here is a preview of my selected frame. Can not wait to pick it up! 

Frame selection by T. Clifton Art, Memphis TN
Flowers in a Vase by NeedleDeeva (ND 311)
Canvas comes with stitch guide by Robin King
Design area 8" x 8" on 18 mesh

Also, look at the amount of undercut the liner has (about 3/8")... 


Frame respects the design area.

... and how, if not considered, the frame can encroach into the design area.


No respect for the design area.

One last suggestion... don't take your canvas off the stretcher bars until your "meet and greet" with the framer. It is most likely you still have some stitching to do. LOL.

Well, there is still much to do between now and traveling to The Bristly Thistle.  Time to make my Teaching Manual as well a long list of other things. Don't worry... I'll be back soon.

Until then... Hugs, Robin

Tuesday, September 25, 2012

Pink and Green are the "new" Black

Hi Everybody... Robin here.

When I was growing up, there were two basic Halloween colors: Black and Orange.


In the 1990s, Purple was introduced as the "new" Black.


Soon after that, an "acid" Lime Green came along.


Now in 2012, we have a new Halloween color palette brewing: Hot Pink, Pink, and Green... all thanks to Barbara Bergsten Designs.


Barbara, known for the wonderful "Lilly Pulitzer" inspired color palette of needlepoint canvases, is now embracing her "newly found" inner Halloween. These are so cute, and are about 3 inch ornaments on 18 mesh. (On 14 mesh they are 3.75".) Available soon from your Local Needlepoint Shops. I can not wait to stitch these!

Shoes • H-01 • Barbara Bergsten Designs

Bat • H-02 • Barbara Bergsten Designs

Cat • H-03 • Barbara Bergsten Designs

Skull • H-04 • Barbara Bergsten Designs

Hat • H-05 • Barbara Bergsten Designs

Spider • H-06 • Barbara Bergsten Designs

Be sure to check out the Barbara Bergsten Design website. Here are some handy links:
This is what is great about Halloween... the more unexpected colors, the better.

Thanks to the Pantone website for their wonderful color samples.

Until the next time... Hugs, Robin

Monday, September 24, 2012

You say Scallops and I think Scallops

Hi Everybody... Robin here.

Scallops. For most people, when Scallops are mentioned, this is what they think of...

Scallops and Ravioli

Tender, sweet, buttery Scallops. Truly one of the sea's most cherished gifts. This photo was one of my memorable meals from Baltimore 2011. It was Scallops and Ravioli.

But, as this is a Needlepoint blog, we think of the other kind of scallops: a series of curved projections.

This scalloped design is a fun pattern to stitch. Currently, I am stitching a roof, and thought the Scallops would look nice for the roof tiles.

Scalloped Stitches 

Here is another chart for you. Use it as diagramed with two different colors or values; use it with the same thread throughout... your choice.


Until the next time... Hugs, Robin

Saturday, September 22, 2012

An Autumnal Equinox gift for you

Hi Everybody... Robin here.

Wishing each of you a pleasant Autumnal Equinox...

What better way to say hello to the first day of fall than a gift from me to you... the Pumpkin and Wheat Blackwork diagram.


Originally, I designed this stitch for the Katt Z. Witch (KCN 9125) background. A lot of effort for the tiny surface, but given a larger area, wouldn't this be a fun background?

Since this is a Blackwork pattern, be careful and follow the numbers so you don't see the travel threads.


Pumpkins and Wheat Sheaths and Black Cats, oh my!...   ♪These are a few of my favorite "autumnal" things.♬

I used 1 strand of Soot (Soy Luster #510) from Dream House Ventures on 18 mesh. Love that name, don't you?

I planned it out in Photoshop before I actually stitched on the canvas. Originally, I had the design with a larger scale, but reduced it to fit this area. You can do this, too. Sizing up or down. All you need is some graph paper.


Add the Pumpkin and Wheat Blackwork diagram to your personal book of stitches. Think of me when you stitch it, and send me a photo, OK? I would love to hear from you.

Also, any shop owners or students interested in this Stitch Guide? There are some great ideas... 11 pages for this Katt Z. Witch canvas by Kelly Clark Needlepoint (KCN 9125). Just let me know...


Here is an awesome link describing the Autumnal Equinox. Check it out.
http://earthsky.org/astronomy-essentials/everything-you-need-to-know-about-the-autumnal-equinox-of-2012

Time to go look for a sweater. I feel a welcomed chill 'a coming.

Until the next time... Hugs, Robin

Thursday, September 20, 2012

Magnetic Picture Frames

Hi Everybody... Robin here.

Magnets. We have a passion for them; adorning our needlepoint while we stitch. Match the magnet to the theme of your design? These days, it is easy to do.

Look what I found...


A metal/magnetic picture frame. Brilliant, right? It comes with 4 tiny magnets to hold your cherished photo in place.


It has a simple "kick stand" to sit on a shelf or a table. Comfortably holds a 4x6 photo. Looks like it could hold a 5x7 photo as well.

Which got me thinking ... couldn't it display my magnets, too?


Yes, it can. Here's the same photo of Jules with some of my Cat Magnets.

I went back to Stitchers Inc. (Memphis, TN) the next day and purchased this Lime Green magnetic picture frame, too. It was purr-fect for my newly acquired stash of Magnets.


FYI, there is also a purple magnetic picture frame, too, as well as larger magnetic boards (light blue or hot pink) for holding a chart. Give Jan a call... she can hook you up.

Thanks for letting me share my new find with you. It is affordable, whimsical and functional, too. My kind of fun.

Until the next time... Hugs, Robin

Wednesday, September 19, 2012

Teaching at Bedecked and Beadazzled 2012

Hi Everybody... Robin here.

When last we spoke, I was only 3 hours into describing the last day of TNNA Fall Needlecraft Show. Let's pick up from there...

Approaching the noon hour, my chariot arrived; taking me to the land of Bedecked and Beadazzled. (Big thanks to Missy and Francis.)


It is certainly a magical place. Full of wonderment. And needlepoint, too. I had been invited to teach the Lotus Squared canvas by Zecca (ZE 134) to a full house. Seeing friends from Facebook was fun. I even met Ruth's mother, Bessie. What a jewel.

As with any Ruth Schmuff event, presentation is everything. Look at those awesome gift bags.


Before class, I took some photos of her shop. 


Look at all of those threads!


Yes, the rumors are correct: Lime Green walls and Leopard carpeting adorn her shop. There is even a black Chandelier, too.


Ruth has the most awesome finished models on display.


And, new canvases, too.


If you are into Pinterest, here is your Ruth Schmuff/Bedecked and Beadazzled board... just add lime green and leopard. 

The class was scheduled from 1PM - 4PM. Everyone completed the first stitched Lotus. From there, all they need to do is the Background stitch (Skip Tent), repeat 3 more Lotus designs, and call this project done. Did I mention it is on 13 mesh? Love it.

Ruth also took photos during the class. You can see them on her blog, It's Not Your Grandmother's Needlepoint.

I was also a customer at Bedecked and Beadazzled. What can I say? The lady has good stuff...

Here's some of the new things I brought home:

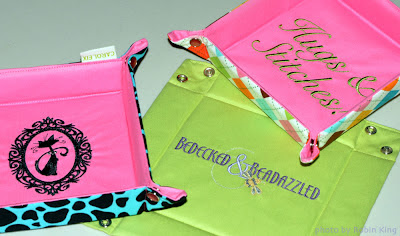
Snap Trays. I had some but they were already full. Now,  I have more. Gotta love the Snap Trays. (Thanks for the awesome design, Carol.)


Brads. Can't wait to add these to a canvas. So cute. Halloween and Snowflakes. I am an equal holiday fanatic.

More Accoutrement Magnets. All from Ruth's shop. The Bedecked and Beadazzled magnet is nice. Love the Hello Kitty, Elegant Kitty and the Butterfly, too.


Sequins from The Collection. I hadn't seen these, and let me tell you, when you need a little bling, these are good to have on hand. Need to enhance your stash? Just give Ruth/Bedecked and Beadazzled a call.


After class, it was my last supper of Baltimore Crab Cakes. OMG, are they so good! (And, having picked hard-shelled crabs the night before, I really appreciate them now.) But actually, it is also the company which brings them to the next level of superb-ness. New word? Go ahead and use it. 

I had the best time during these 4 days in Baltimore. Hope it isn't my last visit. 

Until the next time... Hugs, Robin

Blog Archive