Hi guys,
I haven't had time to stitch in the last few days. I hope to do a little more work on the groom tomorrow before getting back to the Haunted House.
Peggy
Thursday, July 29, 2010
Sunday, July 25, 2010
Cane and wedding rings

I've been working on the cane and started the double wedding ring background. This guy is looking better every day.
I hope you all are well and enjoying stitching.
Peggy
Wednesday, July 21, 2010
Zomme B. Grum'e odds and ends

A few more areas are complete. Here is the grooms left hand. I covered the white and black threads here. That wasn't in the guide, but I went by the pictures. (Thank goodness for the pictures.) I also finished the open stitch that is on the lower background.

Here is the pumpkin leaf and tendril. They work up very quickly. There are four different threads used for these. I have been getting out all of the threads needed for an area and threading them all up. It really speeds things up.
I love these little areas. You get a quick feeling of accomplishment.
Tuesday, July 20, 2010
About.com Survey
About.com has done a survey on customer service in local needlepoint shops. The results are shocking. You can see the results and take the survey here.
Jane at Chilly Hollow has also expressed her concern. Go here to see what she has to say.
You all know I work at and LOVE Amy's Golden Strand in Memphis, TN. Good customer service is paramount there. Amy has put together a dedicated and passionate staff. We would love to help anyone who has had a bad experience at their LNS or who does not have a LNS.
If you know of a great shop, please let us know about it. I invite you to comment on good experiences you have had with a shop.
A tombstone to lean on.


Observe the finished tombstone. Amy has added some more detail to the tombstone than is painted. I put the photograph on my canvas so I could reference it easily. It doesn't have to be exactly like hers. Just get the jest of the shadows she is trying to create. It is better to stitch the shadows before the satin stitches. It works up quickly. You can see that I have restored the pumpkin.
A little stitching every day keeps Peggy very happy! Stitch on.
Monday, July 19, 2010
Spiders and more!

Stitch on,
Peggy
Saturday, July 17, 2010
Painting the Merry Mobile - part two
Hi Everybody ... Robin here.
Hope everyone had a nice week. Mine was fast and furious. I submitted two TNNA class proposals for the January 2011/Long Beach, CA Market. The first canvas is from Zecca. The second canvas is from one of Melissa Shirley's new designers. TNNA said they would make their class decisions announcement around August 27. I'll be sure to let you know what they say. Fingers crossed.
Next on the agenda for painting the Merry Mobile was to add the various shades of gray, silver, and white. The effects are subtle on the computer; however, in person, there is a nice metallic shine on the counter top.

I did my best to try to create painted shadows and highlights. I also told myself the needlepoint will take everything to the next level. The final phase of painting will be to tackle the background. Hope my mojo stays with me. Fingers crossed. Thanks, Robin
Hope everyone had a nice week. Mine was fast and furious. I submitted two TNNA class proposals for the January 2011/Long Beach, CA Market. The first canvas is from Zecca. The second canvas is from one of Melissa Shirley's new designers. TNNA said they would make their class decisions announcement around August 27. I'll be sure to let you know what they say. Fingers crossed.
Next on the agenda for painting the Merry Mobile was to add the various shades of gray, silver, and white. The effects are subtle on the computer; however, in person, there is a nice metallic shine on the counter top.

Grum'es Men

These Grun'es Men match the bridesmaids on the bottom of the Bride Z. Illa canvas. They sit on a bed of a composite stitch which, like most of the stitches in this series, require excellent counting. I did the square stitch first, then the other one. But I had a thought later that it may have been easier to do the smaller stitch first. As you start this section, ponder whether you should do the square stitch or the other one first. You may stitch each area between the guys as a separate area. At least I did. I had tried to make the pattern work out as if the skulls are sitting on a perfectly counted out area. But each section looked better by putting the square stitch snug on the top left side of each skull.
Spiders next!
Thursday, July 15, 2010
The dog ate my homework!
Ok, I don't have a dog. But I have a cat...who nicked the Neon Rays in the Grum'e's pants just as I was finishing them. It happened when I flipped the canvas over to tie off the thread. I couldn't even get mad at him. He just wanted a little attention.
 It affected one side of the pumpkin too. So it is a little set-back. My advice on the pants. Count, count, count. The color chart is invaluable. Remember which color you are on in the graph as you go. If you must stop for a while, stop with the needle up on top of the canvas, and in the middle of a row. And write down which color you have stopped on. I promise, you will not remember it if you don't write it down, and then you will waste time counting to see which row you are on. This will all make sense when you look at the chart. It is one of my favorite stitches.
I hope your stitching is going well.
Peggy

I hope your stitching is going well.
Peggy
Wednesday, July 14, 2010
A Coat fit for a Grum'e

Well isn't that a fine coat. We have to add the torn bits and pieces as well as a few buttonholes, but here he is. If you turn your canvas 1/4 turn, (with the stitching area on the bottom), it is easier to stitch the right side. The stitches go in the opposite direction from the stitches on the left side. And it was not a problem that I put in the collar before the rest of the coat. I could tuck the threads up under the collar.

Tuesday, July 13, 2010
A Coat for the Grum'e

I've completed the left side of the coat for the Grum'e. It is a great area to practice your "laying thread" skills. All rows have blended threads. Some of them combine different colors of the same thread, and some combine different thread types. Interesting effect.
Monday, July 12, 2010
Don't watch TV when you stitch the Vest!
The Grum'e has a lovely brocade style vest. And it looks really good if you lay the stitches in tight and straight. It takes a little concentration to successfully complete it. You can get into a rhythm, but TV and husbands can be disruptive.You have another opportunity here to use that new little flat iron. I used it on both of the threads used in the vest.


Look closely at the right side of my vest. I have a small compensated row. I would rather not have that row, but it will stay in. You can be aware of it and line it up on the right edge like Amy's. Compare it to the picture with the guide. I think it looks a lot better than mine. Live and learn!
Have a great day,
Peggy
Saturday, July 10, 2010
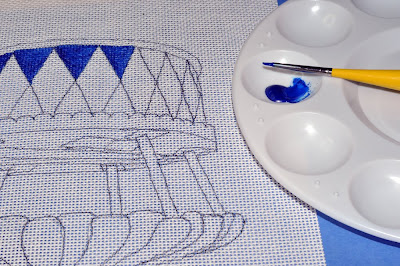
Painting the Merry Mobile - part one
Hi Everybody... Robin here.
"I think I can... I think I can..."
That was me as I traced the Merry Mobile design on to the 18 mesh canvas. Working with the light box, the photograph glowed from below. My mechanical pencil captured each curve and detail. I had my trusty White Eraser near by, just in case. The lines were faint but accurate. I then reinforced them with the Black IDenti-Pen to give me parameters when painting.

So far this project has all the wonders of childhood: ice cream, art supplies and painting. Woo-hoo! Pat and I took the Merry Mobile photograph to Michael's Arts & Crafts and selected the various acrylic paints and supplies. He was in charge of selecting the correct Red and Blue paints. I found the cutest paint brush. It's a Spotter 5/0. Love that name.
"I think I can... I think I can..."
The TV was off; the door was closed... no cats... I needed to be in a zone! My work area was prepared; I was using the same magnifier light I use for needlepoint. After all, I needed to see. I began painting the blue area. I was trying to channel the greats: SharonG, Melissa Shirley, Leigh Richardson... for any possible painting mojo.
Breathe! Exhale!

Whew. One triangle done. And it's looking pretty good. Onward to triangle #2. Pat came in the room... and a few cats, too... to check on me. He picked up his camera to document this moment. The Merry Mobile was beginning to come to life. Always the photographer!

Once the blue triangles were painted, I began the blue sections of the canopy. Then the last accomplishment of the evening was to paint the red triangles. I didn't want to push my luck/mojo. I told myself, "things needed to dry before the next painting session." Made sense to me. Next time: shades of gray.
Thanks, Robin
Friday, July 9, 2010
The Groom's shoes.
 The groom's shoes are a fun little stitch, but stitching black on black makes it a little harder. Normally I would do the larger pattern first and then go back and fill in the small accent stitch. But I worked with both threads to fill in the accent as I went along. That black on black is a struggle for most. Don't forget to put something white in your lap to help you see the black canvas better. I use a white pillowcase. The picture is small because I don't want to give the stitch away to those who are not part of the club. It's a copyright thing.
  Take a few minutes to cover the lines in the Groom's pants with that marker that was included in your kit. The guide has us stitch over them with one of my favorite stitches. Read the instructions carefully to make sure you don't cover the lines that aren't grey. In this photo I have covered the correct lines. The remaining white and off-white lines you see here will be stitched later. I would suggest you do it one night when you are finished stitching for the day. That will give the ink plenty of time to dry before you stitch again.
 How about that tie.

I quickly stitched the Groom's tie. And I started to work on the vertebra and ribs, but quickly realized I didn't have a good place to start or tie off, as the ribcage is open. You must be careful not to let the thread travel behind the ribs. I did the vertebra first starting at the top and going straight down. Then I needed the lapels to bury threads for the ribs. I may regret stitching the lapels before the coat as the lapels are "above" the coat. But I will take a chance. Happy Stitching!
Peggy
Wednesday, July 7, 2010
Merry Mobile, an Ice Cream Truck needlepoint project begins
Hi Everybody... Robin here.
I'd like to tell a little story about my next Needlepoint Study Hall blog topic. I got a wonderful suggestion from Jane/Chilly Hollow about what I might consider for my next stitching project. (She is such a gifted enabler!) With her innocent words: it's summer time... , I started to think about a project I had wanted to do for a long time. Here's some background first.
Pat (my guy!) is from Memphis. His childhood memories of summer included ice cream being served from the Merry Mobile -- a self-propelled carousel ice cream truck unique to Memphis, TN and Louisville, KY in the 1960s. Pat is a photographer and owns Business Visuals. A few years ago after completing a location photo shoot, he ran across an old discarded Merry Mobile in a salvage yard parking lot.
Well, Pat did what he had to do... he photographed the Merry Mobile. Listening to Pat's stories, I could only imagine what it looked like, but now with a photo, I could finally see it. Time had not been kind to the Merry Mobile. Thirty years had passed; it was rusted and faded. Pat showed me the photos and described (with enthusiasm) the former paint scheme, the shiny metal counters, and the jingle of the bells. One of the first phrases Pat remembers saying was "a nickel and a penny" because that's how much his ice cream cost.
Besides being a talented photographer, Pat also excels at doing Photoshop. It upset him to see his childhood memory all in ruins. Pat decided to bring the Merry Mobile back to life... through Photoshop. On his blog you can read Pat's entry and see the Before & After photos.
OK, you're thinking... what does any of that have to do with needlepoint?

Well, I'm going to stitch the Merry Mobile. Working from Pat's design, I'm going to create a painted canvas. Then I'm going to stitch it. Who knows where this journey will take me? Hope you will join me for the ride. Thanks, Robin
I'd like to tell a little story about my next Needlepoint Study Hall blog topic. I got a wonderful suggestion from Jane/Chilly Hollow about what I might consider for my next stitching project. (She is such a gifted enabler!) With her innocent words: it's summer time... , I started to think about a project I had wanted to do for a long time. Here's some background first.
Pat (my guy!) is from Memphis. His childhood memories of summer included ice cream being served from the Merry Mobile -- a self-propelled carousel ice cream truck unique to Memphis, TN and Louisville, KY in the 1960s. Pat is a photographer and owns Business Visuals. A few years ago after completing a location photo shoot, he ran across an old discarded Merry Mobile in a salvage yard parking lot.
Well, Pat did what he had to do... he photographed the Merry Mobile. Listening to Pat's stories, I could only imagine what it looked like, but now with a photo, I could finally see it. Time had not been kind to the Merry Mobile. Thirty years had passed; it was rusted and faded. Pat showed me the photos and described (with enthusiasm) the former paint scheme, the shiny metal counters, and the jingle of the bells. One of the first phrases Pat remembers saying was "a nickel and a penny" because that's how much his ice cream cost.
Besides being a talented photographer, Pat also excels at doing Photoshop. It upset him to see his childhood memory all in ruins. Pat decided to bring the Merry Mobile back to life... through Photoshop. On his blog you can read Pat's entry and see the Before & After photos.
OK, you're thinking... what does any of that have to do with needlepoint?

Spooky Guys
Peggy
Tuesday, July 6, 2010
Groom's Hat

Peggy
Monday, July 5, 2010
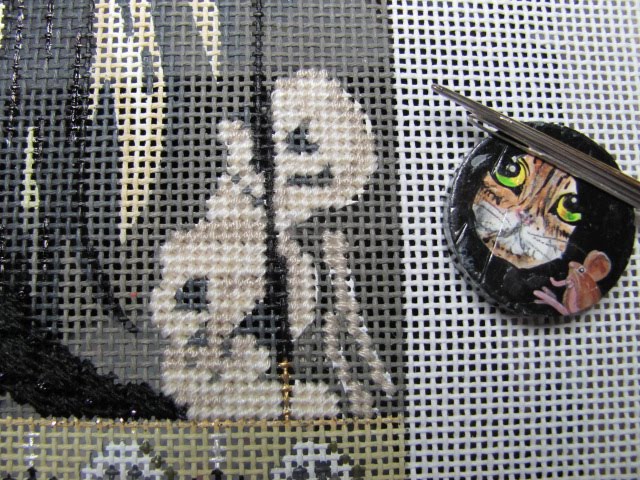
Floating Cat with Pumpkin Balloon is FINISHED!
Hi Everybody... Robin here.
Yesterday, while observing the "proper" July 4th holiday, I treated myself to some needlepoint time. And, guess what? I finished the Floating Cat with Pumpkin Balloon. Yippee!

When last we spoke, I was going to work on the Eyes. It took three attempts, but I finally got the results I wanted. I believe the Eyes are very important, and I wanted him to have the biggest eyes. After all, look how high he is above the buildings! Then I did the Nose and then the Mouth. I used the new Kreinik Holographic Thread size 8 Blinding Black #005L for the Whiskers. It gave a nice reflective sparkle and attitude for our floating friend.
The last thing on the list to do was the Balloon String. I used Petite Frosty Rays with a Wrapped Backstitch; love it.
So now he's finished. The official number of this canvas from Kirk & Hamilton is KH115. They have it listed on their website as a Spectacles Case... that's Eyeglasses Case for us on this side of the Pond. The design is 3"W x 6½" H on 18 mesh.
If you are new to the Needlepoint Study Hall blog and just found the Floating Cat with Pumpkin Balloon, I have labeled this topic as Floating Cat as well as Kirk and Hamilton. The Topics List is on the right column; under Our Blog List is Growing entries. Just click on either topic and all previous blog entries will come up bundled for your viewing pleasure. I am compiling all of my stitches and threads for a stitch guide. Let me know if you are interested in it.
So now, what's next for Robin? Well, this morning, I'm a bit clueless. I did receive in the mail the wonderful new canvas from Zecca which I will be stitching & creating a Stitch Guide & teaching at TNNA in Long Beach January 2011... but that needs to remain secret for a little while. My previous NSH postings have been Jane/Chilly Hollow inspired; I do have an awesome Stash, however.
Enjoy your "extended" July 4th holiday today. I will see you soon. Thanks, Robin
Yesterday, while observing the "proper" July 4th holiday, I treated myself to some needlepoint time. And, guess what? I finished the Floating Cat with Pumpkin Balloon. Yippee!

The last thing on the list to do was the Balloon String. I used Petite Frosty Rays with a Wrapped Backstitch; love it.
So now he's finished. The official number of this canvas from Kirk & Hamilton is KH115. They have it listed on their website as a Spectacles Case... that's Eyeglasses Case for us on this side of the Pond. The design is 3"W x 6½" H on 18 mesh.
If you are new to the Needlepoint Study Hall blog and just found the Floating Cat with Pumpkin Balloon, I have labeled this topic as Floating Cat as well as Kirk and Hamilton. The Topics List is on the right column; under Our Blog List is Growing entries. Just click on either topic and all previous blog entries will come up bundled for your viewing pleasure. I am compiling all of my stitches and threads for a stitch guide. Let me know if you are interested in it.
So now, what's next for Robin? Well, this morning, I'm a bit clueless. I did receive in the mail the wonderful new canvas from Zecca which I will be stitching & creating a Stitch Guide & teaching at TNNA in Long Beach January 2011... but that needs to remain secret for a little while. My previous NSH postings have been Jane/Chilly Hollow inspired; I do have an awesome Stash, however.
Enjoy your "extended" July 4th holiday today. I will see you soon. Thanks, Robin
Sunday, July 4, 2010
Neon Rays-Curling Iron

Well I got precious little done today. But I did learn a great trick. At one of Amy's spring Cook-Up classes a participant used a little curling iron to get the kinks out of Neon Rays. Well I tired it on the Neon Rays for the Groom's teeth. It works GREAT!!! I hate pulling on Neon Rays to get the kinks out because it makes it thinner. So this is the perfect solution. Below is a tiny curling iron that I will now keep with my stitching supplies. Who knew?!!

Sparklers and Fireworks
Hi Everybody... Robin here.
While Peggy is getting acquainted with the newest "man" in her life... the Zomme B. Grum'e... I wanted to wish each of you a Happy July 4th from us in Needlepoint Study Hall. This has been a fast year, for sure. I found my lone piece of July 4th stitching: this needlepoint belt. I think it makes a nice decorative sentiment. Enjoy the day. Thanks, Robin
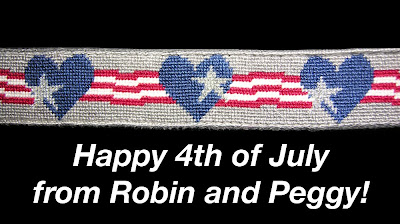
While Peggy is getting acquainted with the newest "man" in her life... the Zomme B. Grum'e... I wanted to wish each of you a Happy July 4th from us in Needlepoint Study Hall. This has been a fast year, for sure. I found my lone piece of July 4th stitching: this needlepoint belt. I think it makes a nice decorative sentiment. Enjoy the day. Thanks, Robin

Thursday, July 1, 2010
The Groom Stitch Guide

All I have had time to do today is read the stitch guide...three times. It is full of wonderful directions and great tips. Big tip...stitch the shoes before stitching the gold and black line borders. If I was just stitching along in the order the guide was written, I would have stitched those lines before turning the page to see the tip. And this guide is huge. I don't think it will be as difficult, as say Stirha Cal Dron, but there are a lot of directions. There are referrals to past diagrams from other guides too. You might want to pull those out and put them with this kit so it is ready when you get ready. I have made a copy of the guide that I can write on and not worry about getting dirty. I highlight the number of strands and the thread called for in each area in yellow. Then I highlight the diagram number in pink. That may be going a bit far, but it helps me. So it couldn't hurt. I am really going to try to finish this guy this month. I plan to do the background rings last and then stitch the same background on the bride right after that while I have the count in my brain. Don't forget to make a color photocopy of the canvas for placement purposes later. (Then destroy the copy please!)

Here is Ethan looking over my shoulder. If he wants to sit in my lap, he just puts a paw on my back and waits for me to clear a space for him. When I say, "OK!" he gets in my lap. Cool cat.
Subscribe to:
Posts (Atom)