Sorry to be away so long from the Blog. Since I've been back from TNNA/ Phoenix, I have been working on projects which were shouting my name. Does that ever happen to you? Basking in the warm fuzzy aura of a "job well done" and then life pinches you back into reality. Oh well...
Since this is "mostly" a needlepoint blog, thought I would share the conclusion of the DMC Memory Thread on the 3D Cake from Associated Talents (CD 1200). I had to teach the lesson first to the TNNA students/shop owners. Here's the link to the earlier blog posting. Now that that's done, it is time to share my learned knowledge with you.
The DMC Memory Thread decorated and frosted the cake in 3D style. I used White, Pink, Green for the Flowers/Leaves and Frosting details. I used Gold for the Cake Stand. I followed the design originated by design artist, Alice Okon from DMC, and gave it my own spin, too.


Here are some of the things I learned while working with DMC Memory Thread:
- Use a working length of DMC Memory Thread longer than the intended final length. You will want to have "legs" at both ends which will plunge through to the backside of the canvas to be secured.
- Pre-shape the DMC Memory Thread before attaching to the canvas.
- Use an awl, laying tool or trolley needle to gently open the canvas hole. Have some tweezers handy to grab onto the plunged end.
- Do not try to insert the DMC Memory Thread into a needle for plunging purposes.
- Pink Hair Dresser's Tape (or any other kind of low-tack tape) is good to use keeping working legs out of the way prior to securing to the backside of the canvas.
- Have someone apply pressure to the surface of the shaped design while you are making the initial securing steps to the back of the canvas. This will help keep the design from losing its shape.
- You can successfully apply DMC Memory Thread on top of open canvas work. Just be mindful and mirror the design pathway when securing it to the backside of the canvas.
Here is what the backside looked like as I was designing with the DMC Memory Thread. I placed each element onto the canvas, and then taped it to the backside with Pink Hair Dresser's Tape to keep it out of the way.


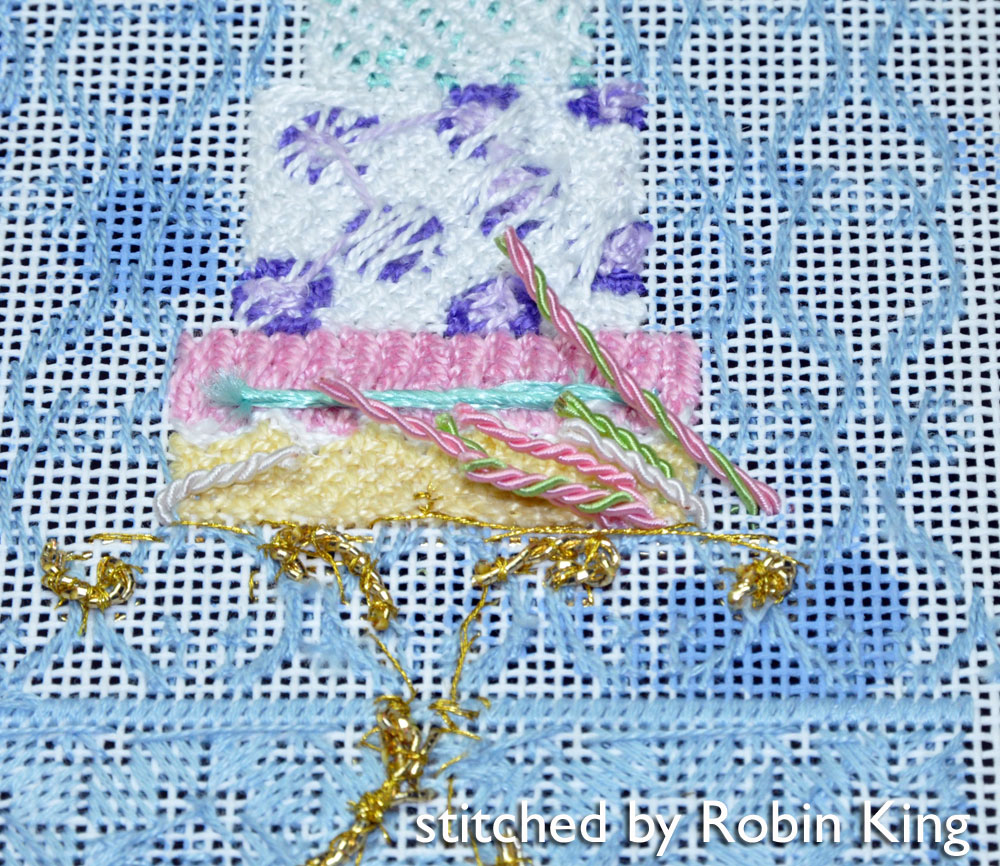
DMC Memory Thread 6050 White was used for each of the different Cake Tier Frosting Decorations. The bottom Cake Tier was 2 pieces: twisted together and attached to represent the Cable Decoration. The middle Cake Tier was 1 piece: bent into a squiggle design using your fingers; maintaining all segments to be the same height. Tweezers were used to gently pinch the segments together. The top Cake Tier was 1 piece: tied in consecutive Knots. Each Frosting Decoration was placed and tested for best shape before they were permanently attached to the canvas using 1 strand DMC Floss 3865.


Here is a collection of some of the different shapes used with the DMC Memory Thread. Notice their long "legs" were helpful used for placement and securing to the canvas.

Currently, there are 28 colors. DMC also has a handy chart on their website for selecting the DMC Floss used for couching the Memory Thread in place.

The main thing I learned was to play with and have fun with the DMC Memory Thread. It is a wonderful product. Great for giving your needlepoint a fun 3D effect. I've been told my stitch guide will be available on the DMC website, too. Sweet!

Now, who wants some cake? Until the next time... Hugs, Robin
Absolutely draling Robin and very informative. Trying to print info so I can refer back to it!
ReplyDeleteJeannine
BeStitched Needlepoint
Congratulations! That's one tasty looking cake.
ReplyDeleteJane, suddenly hungry in CH
This is the cutest thing ever! I need a private tutorial some day soon. I use it and get tangled up in it. Maybe when I come to Memphis I can get a lesson. You are so talented. Keep it up!
ReplyDeleteStephanie
stephsstitching.blogspot.com
Love this info Robin! I've not shaped the pieces before attaching, but I can see that this
ReplyDeleteworks very well! I'm going to go buy some Pink Tape! Wonder if I shouldn't also be using it on my unruly hair! And on my bra straps...and on my crows feet...or my mouth!
You are amazing!! Awesome instructions. Thank you, Robin!!
ReplyDeleteAWESOME!!! Robin I absolutely love it!
ReplyDelete