Wednesday, July 7, 2010

Merry Mobile, an Ice Cream Truck needlepoint project begins

Hi Everybody... Robin here.

I'd like to tell a little story about my next Needlepoint Study Hall blog topic. I got a wonderful suggestion from Jane/Chilly Hollow about what I might consider for my next stitching project. (She is such a gifted enabler!) With her innocent words: it's summer time... , I started to think about a project I had wanted to do for a long time. Here's some background first.

Pat (my guy!) is from Memphis. His childhood memories of summer included ice cream being served from the Merry Mobile -- a self-propelled carousel ice cream truck unique to Memphis, TN and Louisville, KY in the 1960s. Pat is a photographer and owns Business Visuals. A few years ago after completing a location photo shoot, he ran across an old discarded Merry Mobile in a salvage yard parking lot.

Well, Pat did what he had to do... he photographed the Merry Mobile. Listening to Pat's stories, I could only imagine what it looked like, but now with a photo, I could finally see it. Time had not been kind to the Merry Mobile. Thirty years had passed; it was rusted and faded. Pat showed me the photos and described (with enthusiasm) the former paint scheme, the shiny metal counters, and the jingle of the bells.  One of the first phrases Pat remembers saying was "a nickel and a penny" because that's how much his ice cream cost.

Besides being a talented photographer, Pat also excels at doing Photoshop. It upset him to see his childhood memory all in ruins. Pat decided to bring the Merry Mobile back to life... through Photoshop. On his blog you can read Pat's entry and see the Before & After photos.

OK, you're thinking... what does any of that have to do with needlepoint?


Well, I'm going to stitch the Merry Mobile. Working from Pat's design, I'm going to create a painted canvas. Then I'm going to stitch it. Who knows where this journey will take me? Hope you will join me for the ride.  Thanks, Robin

Spooky Guys


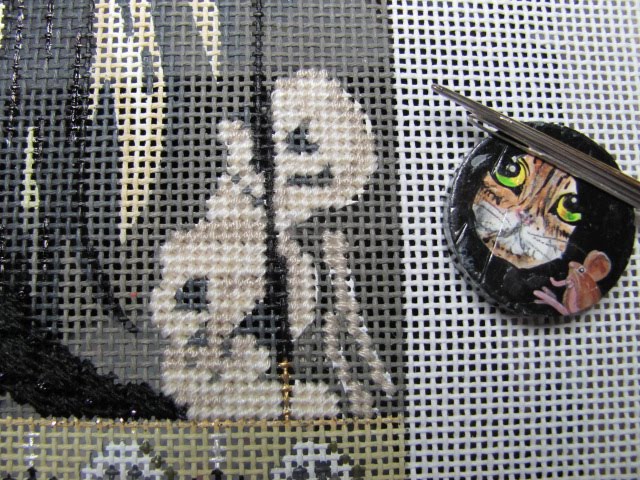
I  had two needles going as I did the sculls.  I had not done that on some of the other Characters.  It went much easier for me this way.  Amy provides a great chart to follow.  But if you get off a stitch or two, don't take it out.  It will still look good.  Also, see my favorite magnet.

Peggy

Tuesday, July 6, 2010

Groom's Hat

What a dapper hat.  I like the bright orange hat band.  As you start to do the top of the hat, take a good look at the picture on the front of the guide for the best placement of the first Hungarian stitch.  If you place it in the middle touching the orange band it will showcase the stitches well.  Please read the "Tip" at the bottom of page 5 before you work the hat.  It will really help you.

Peggy

Monday, July 5, 2010

Floating Cat with Pumpkin Balloon is FINISHED!

Hi Everybody... Robin here.

Yesterday, while observing the "proper" July 4th holiday, I treated myself to some needlepoint time. And, guess what? I finished the Floating Cat with Pumpkin Balloon. Yippee!


When last we spoke, I was going to work on the Eyes. It took three attempts, but I finally got the results I wanted. I believe the Eyes are very important, and I wanted him to have the biggest eyes. After all, look how high he is above the buildings! Then I did the Nose and then the Mouth. I used the new Kreinik Holographic Thread size 8 Blinding Black #005L for the Whiskers. It gave a nice reflective sparkle and attitude for our floating friend.

The last thing on the list to do was the Balloon String. I used Petite Frosty Rays with a Wrapped Backstitch; love it.

So now he's finished. The official number of this canvas from Kirk & Hamilton is KH115. They have it listed on their website as a Spectacles Case... that's Eyeglasses Case for us on this side of the Pond. The design is 3"W x 6½" H on 18 mesh.

If you are new to the Needlepoint Study Hall blog and just found the Floating Cat with Pumpkin Balloon, I have labeled this topic as Floating Cat as well as Kirk and Hamilton. The Topics List is on the right column; under Our Blog List is Growing entries. Just click on either topic and all previous blog entries will come up bundled for your viewing pleasure. I am compiling all of my stitches and threads for a stitch guide. Let me know if you are interested in it.

So now, what's next for Robin? Well, this morning, I'm a bit clueless. I did receive in the mail the wonderful new canvas from Zecca which I will be stitching & creating a Stitch Guide & teaching at TNNA in Long Beach January 2011... but that needs to remain secret for a little while. My previous NSH postings have been Jane/Chilly Hollow inspired; I do have an awesome Stash, however.

Enjoy your "extended" July 4th holiday today.  I will see you soon. Thanks, Robin

Sunday, July 4, 2010

Neon Rays-Curling Iron


Well I got precious little done today.  But I did learn a great trick.  At one of Amy's spring Cook-Up classes a participant used a little curling iron to get the kinks out of Neon Rays.  Well I tired it on the Neon Rays for the Groom's teeth.  It works GREAT!!!  I hate pulling on Neon Rays to get the kinks out because it makes it thinner.  So this is the perfect solution.  Below is a tiny curling iron that I will now keep with my stitching supplies.  Who knew?!!

Sparklers and Fireworks

Hi Everybody... Robin here.

While Peggy is getting acquainted with the newest "man" in her life... the Zomme B. Grum'e... I wanted to wish each of you a Happy July 4th from us in Needlepoint Study Hall. This has been a fast year, for sure. I found my lone piece of July 4th stitching: this needlepoint belt. I think it makes a nice decorative sentiment. Enjoy the day. Thanks, Robin


Thursday, July 1, 2010

The Groom Stitch Guide


All I have had time to do today is read the stitch guide...three times.  It is full of wonderful directions and great tips.  Big tip...stitch the shoes before stitching the gold and black line borders.  If I was just stitching along in the order the guide was written, I would have stitched those lines before turning the page to see the tip.  And this guide is huge.  I don't think it will be as difficult, as say Stirha Cal Dron, but there are a lot of directions.  There are referrals to past diagrams from other guides too.  You might want to pull those out and put them with this kit so it is ready when you get ready.   I have made a copy of the guide that I can write on and not worry about getting dirty.  I highlight the number of strands and the thread called for in each area in yellow.  Then I highlight the diagram number in pink.  That may be going a bit far,  but it helps me.  So it couldn't hurt.  I am really going to try to finish this guy this month.  I plan to do the background rings last and then stitch the same background on the bride right after that while I have the count in my brain. Don't forget to make a color photocopy of the canvas for placement purposes later.  (Then destroy the copy please!)

Here is Ethan looking over my shoulder.  If he wants to sit in my lap, he just puts a paw on my back and waits for me to clear a space for him.  When I say, "OK!" he gets in my lap.  Cool cat.