Showing posts with label Associated Talents. Show all posts

Thursday, February 14, 2013

Hearts by The Nimble Needle - Atlanta

Hi Everybody... Robin here.

Happy Valentine's Day
 ♡ Hope you are with your loved ones doing what you love to do today. ♡


Keeping a Heart theme going, I have some wonderful stitching to share with you. A few months ago, I designed The Nimble Needle's new website. I also photographed their Monthly Clubs models. Lucky me... lucky you.

Hearts Club by The Nimble Needle - Atlanta
Stitch Guides available from The Nimble Needle

Stacy Brown, owner of The Nimble Needle, stitched the Hearts Club; canvases by Associated Talents. Previously offered as a Monthly club, now you can get the Heart Canvas and Stitch Guide of your choice. It was a pleasure seeing each of these Hearts up close during their photo session. And now, you can enjoy them, too.

HE-615 • Associated Talents
Three Hearts/Plaid Heart

HE-619 • Associated Talents
Be Mine Mini Heart

HE-622 • Associated Talents
Heart/Hearts Stripes

HE-623 • Associated Talents
Heart/Stripes Checks

HE-624 • Associated Talents
Hearts/Diagonal Stripes/Dots Heart

HE-625 • Associated Talents
Heart/Woven Ribbons Heart

HE-626 • Associated Talents
Plaid/Pink Bow Mini Heart

HE-628 • Associated Talents
Bows on Tattersall Mini Heart

HE-629 • Associated Talents
Pink/Green Woven Ribbon Mini Heart

HE-631 • Associated Talents
Hearts/Trellis Mini Heart

HE-632 • Associated Talents
Tattersall/Hearts Mini Heart

HE-633 • Associated Talents
Hearts on Lime Mini Heart


Be sure to give Stacy a call (404) 843-8687 at The Nimble Needle - Atlanta. Also, "like" them on Facebook. Here's the link: The Nimble Needle - Atlanta on Facebook

And, speaking of love, the Hugs canvas (GS-11) is still available from Alice Peterson Co. (artist Gayla Elliott).  My stitch guide is available, too.  You can read about my Hugs journey. Here's the link: HUGS (GS-11).


Hugs (GS-11) stitched by Robin King
Stitch Guide is available.

Tomorrow resumes my TNNA / Long Beach 2013 recap - part 4.

Until then... Hugs, Robin


Wednesday, February 13, 2013

TNNA / Long Beach 2013 recap - part 3

Hi Everybody... Robin here.

Continuing my TNNA / Long Beach 2013 journal...

While walking the aisles I saw more new things:

Look at the fine jewelry quality Chains from Embellishments Plus! Look at their pretty Beads, too.


Just the perfect accent.
Beads make me happy.

Also, in the Embellishments Plus! booth, one of the Manuel Salas canvases from Tapestry Fair was on display: Un Pocito De Color (MS-3). Beautifully, creatively stitched by Sherry Bray from Queen Anne Stitches in California.


"Un Pocito De Color" brilliantly stitched by Sherry Bray
artist, Manuel Salas  -- distributed by Tapestry Fair (MS-3)

Sherry's talents are a-mazing! I studied and studied this piece. Absolutely brilliant. If you ever get the opportunity, take a class with Sherry. Purchase one of her stitch guides. Anything! You will be glad you did.


I stopped in to see another Facebook friend, Barbi from Canvas Art by barbi, located in Gilbert, AZ. Barbi had some fun designs. I like her alphabets. Nice "R"... don't you think? Here is a link to her website:  http://www.canvasartbybarbi.com/

barbi the designer
Halloween, Hearts, and Retro... oh, my!
Inserts which fit the Lee leather goods

There was a "celebrity" visitor to the NeedleDeeva booth: Timothy the Spider.

Here's the back story: Timothy is from the creative forces of Associated Talents. Last year, he began to travel outside of his booth and visit other designers and models. Timothy now has a Facebook page. In his photo albums, you can see how much that little spider gets around!

No cupcakes were harmed in the taking of this photo.
The Sugar Skulls were so happy to see Timothy... just look at the smiles on their faces.

More things to share. Stop by again, OK? Until then... Hugs, Robin

Saturday, July 7, 2012

Ribbons at Woodlawn 2012

Hi Everybody... Robin here.

I have never been to Woodlawn but would love to go. My stitching designs, however, have been to Woodlawn, and won ribbons, too. Many thanks to Lori Mazza from
Waste Knot Needlepoint in Arlington, VA for sharing these photos.

I met Lori (owner of Waste Knot Needlepoint) several years ago when she took my
Katt Z. Witch class at TNNA. Since then, she has taken a few other classes of mine including the 3D Cake class (featuring DMC Memory Thread techniques) and the Fraidy Cat class (from the Creepy Characters by NeedleDeeva).

Longtime blog readers are probably familiar with both of these pieces, but for those new to the blog, here is a more direct link to review:  3D Cake and Creepy Characters.

I recently saw Lori at TNNA/Columbus market and she showed me her photos w/ribbons from Woodlawn. How exciting. Here is a summary from Lori.
Here are the pieces I entered into Woodlawn.  They all were in the commercial multi-stitch canvas category...  
I got a 1st place on the cake and an honorable mention on Fraidy Cat... 
As a shop, we put in 31 pieces for our customers and received 16 ribbons out of 31 entries.  
Congratulations to Lori and all of her wonderful stitchers at Waste Knot Needlepoint.

Let's enjoy her photos:

3D Cake by Associated Talents • CD1200
Stitch Guide by Robin King for DMC
Stitched by Lori Mazza /  Waste Knot Needlepoint

Fraidy Cat by NeedleDeeva • ND 0467-H
Stitch Guide by Robin King
Stitched by Lori Mazza /  Waste Knot Needlepoint

Antique Toy Alphabet by Alice Peterson • 3043
Stitched by Lori Mazza /  Waste Knot Needlepoint

Witch by Susan Roberts/Tapestry Tent • AP-430
Stitched by Lori Mazza / Waste Knot Needlepoint

Love the wooden finishings on Fraidy Cat and the Toy Box? Those were done by Sharon Hall at Mountain Shadow Studio located in Denver, CO. Your needlepoint shop can send your work to them for finishing, too.

Hooty Owl was also stitched by Lori and finished by Mountain Shadow Studio. Don't they make a handsome pair! Lori is certainly ready for Halloween.

Hooty Owl by NeedleDeeva • 0467-i
Stitch Guide by Robin King

Seeing one's stitch guides come into reality...  and winning ribbons... is so thrilling. Thank you, Lori for sharing your work our blog readers.

Until the next time... Hugs, Robin

Saturday, May 19, 2012

Free Stitch Guides!

Hi Everybody... Robin here.

Ever want a FREE stitch guide? Well, here is one place you can find them: on the DMC website.

Several months ago, I was asked by DMC to chart/compile a Stitch Guide from Alice Okon's wonderful stitching of Beautiful Flowers by Maggie Co. (M-1429). I just loved this canvas when I saw it in the DMC booth at TNNA/Phoenix. It was also one of the models used in the Memory Thread class which I taught during TNNA.

Beautiful Flowers by Maggie Co. (M-1429)
Stitch Design by Alice Okon • Stitch Guide compiled by Robin King

The notes and photos were emailed to me. All I had to do was label, describe and chart the stitches and techniques. I am amazed at Alice's artistry and usage of the DMC Memory Thread.  Her approach to stitches with DMC thread selection is very creative. In fact, Alternating Diagonal Mosaic stitch inspired me for one of the leaves in Sunflower and Berries (ND 309).

Leaf #5 in Sunflower and Berries (ND 309)
Alternating Diagonal Mosaic stitch

Here's the link to the Needlepoint Stitch Guides on the DMC website:
http://www.dmc-usa.com/Products/Free-Stitch-Guides/Needlepoint-Stitch-Guides

Just click on the Beautiful Flowers image and the PDF will download; ready for you to save to your desktop as well as print for your records. Here is a screenshot of the stitch guide as I was writing it... 14 pages.

Descriptions, Photos, Stitches Diagrams... all for you... FREE.

Want more FREE stitch guides?  The same link will send you to the other free stitch guides from the collaboration of Associated Talents and DMC. Excellent usage of Memory Thread!

The "Shop the Town: Bakery, Boutique, Coffee Shop and Flower Shop" series is so cute. I love these designs by Associated Talents. Download and print these, too... OK?

Free Needlepoint Stitch Guides from DMC

DMC encourages stitches to use some, if not all of these techniques for applying Memory Thread. Visit their website to see their new threads and colors. It is a wonderful website.

Well, that's all for now. I must get back to "work"... code word for stitching, stitch guides, etc...  I will be able to share some of those events on another day.

Until then... Hugs, Robin

Tuesday, February 7, 2012

3D Cake with DMC Embellishment - part three

Hi Everybody... Robin here.

I received permission from DMC, and now I can share the rest of the DMC Memory Thread lesson with you. Get your notepad ready...

During the 3D Cake Embellishment class, I showed the students some wonderfully stitched needlepoint pieces with applied DMC Memory Thread. Everyone was getting comfortable working with it... now was the time to introduce places to use it.

Are you intimidated about where to put the DMC Memory Thread? Here's what I did: make a color paper copy of the painted canvas and get a Sharpie pen. Then, draw lines on your paper indicating possible locations for the DMC Memory Thread.

Plan your pathways with a Sharpie on paper, first.

You can use DMC Memory Thread to outline an area. You can use it as a structure for needleweaving or stumpwork. You can make a 3D design element. You can use it to show movement. It is so versatile. And, there are 28 colors.

Fan Peddler by Labors of Love / LL 270C

Alice Okon, a wonderful designer from DMC, stitched the Fan Peddler from Labors of Love (LL 270C). Her applications were exciting. Just look at all the ways she added DMC Memory Thread to the needlepoint.

Photo #1 shows DMC Memory Thread applied by Alice Okon:
  • the Hat and the Ruffle: nice use of two shades of DMC Memory Thread relating to the painted canvas. The Ruffle Edge is enhanced with the DMC Memory Thread.
  • the Hair: nice use of the DMC Memory Thread showing the Curls of the Hair on top of the Basketweave stitching.
  • the Outline of the Hat Pin: the Silver DMC Memory Thread gives an identifiable edge to the Brooch.
  • the Fan Edges, Doubled Fan Edge and the Collar: these edges are more refined with the application of the DMC Memory Thread. Nice Colors, too.
  • Note: the twisted and coiled DMC Memory Thread into a Purple Rosette on the Green Fan.

Photo #1

Photo #2 shows DMC Memory Thread applied by Alice Okon:
  • the Fan Handles: Picot Needleweaving technique using DMC Gold Or (284 AZ) for the Gold Handle; twisted DMC Memory Thread for the White Fan Handle.
  • the Fan Outlines: keeping true to the painted canvas, the Fan Edges are stitched with DMC Memory Thread.
  • the Fan Embellishments: note there are Beads surrounded by the DMC Memory Thread for detail. Size 8 Mill Hill Beads can be strung onto DMC Memory Thread, as seen on the White Fan Handle.
  • the Basket Edge: is outlined with a single piece of DMC Memory Thread for a nice edge.
Photo #2

Photo #3 shows DMC Memory Thread applied by Alice Okon:
  • the Twisted Edge of the Basket Rim: using two colors of DMC Memory Thread twisted together.
  • the Basket Edge: is outlined with a single piece of DMC Memory Thread for a nice edge.
  • the Fan Edges: double pieces of DMC Memory Thread couched together for the Fan Edge; single piece of DMC Memory Thread used for the curved Fan Edge.
  • the Fan Handles: Picot Needleweaving technique using DMC Gold Or (284 AZ) for the Gold Handle; twisted DMC Memory Thread for the White Fan Handle.
  • the Sleeve Ruffle: the DMC Memory Thread has been used to separate the Sleeve Ruffle placed on top of the Basketweave stitching.
Photo #3

Photo #4 shows DMC Memory Thread applied by Alice Okon:
  • the Spiral Roses: the DMC Memory Thread has been coiled and then shaped into Roses.
  • the Green Leaves: the DMC Memory Thread has been shaped into Leaves on her dress as well as on the Fan.
  • the Purple Coiled Rosette: two pieces of Purple DMC Memory Thread (or one long piece doubled then twisted) have been twisted together and then wrapped into a Coil.
  • the Blue Fan Handle: two pieces of DMC Memory Thread were couched side by side for greater size and proportion of the Handle.
  • the Collar: these edges are more refined with the application of DMC Memory Thread.
  • the Green Fan: has Gold DMC Memory Thread for an outline and a Satin Stitch of Gold Thread inside.
Photo #4
 Here are more photos... close up. Photos from Liz Saylor/DMC. Thanks, Liz!


Next time, I will conclude the DMC Memory Thread journey. So much fun is yet to come.

Until then... Hugs, Robin

Sunday, February 5, 2012

3D Cake with DMC Embellishment - part two

Hi Everybody... Robin here.

Sorry to be away so long from the Blog. Since I've been back from TNNA/ Phoenix, I have been working on projects which were shouting my name. Does that ever happen to you? Basking in the warm fuzzy aura of a "job well done" and then life pinches you back into reality. Oh well...

Since this is "mostly" a needlepoint blog, thought I would share the conclusion of the DMC Memory Thread on the 3D Cake from Associated Talents (CD 1200). I had to teach the lesson first to the TNNA students/shop owners. Here's the link to the earlier blog posting. Now that that's done, it is time to share my learned knowledge with you.

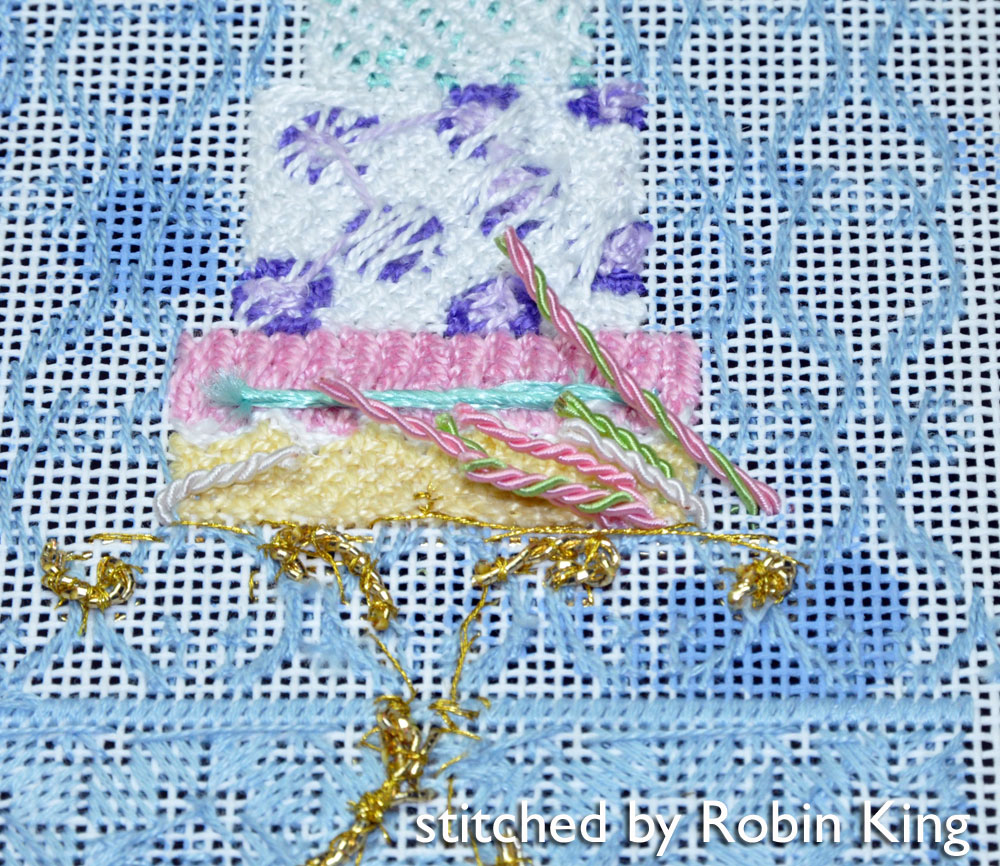
The DMC Memory Thread decorated and frosted the cake in 3D style. I used White, Pink, Green for the Flowers/Leaves and Frosting details. I used Gold for the Cake Stand. I followed the design originated by design artist, Alice Okon from DMC, and gave it my own spin, too.


Here are some of the things I learned while working with DMC Memory Thread:

  1. Use a working length of DMC Memory Thread longer than the intended final length. You will want to have "legs" at both ends which will plunge through to the backside of the canvas to be secured.
  2. Pre-shape the DMC Memory Thread before attaching to the canvas.
  3. Use an awl, laying tool or trolley needle to gently open the canvas hole. Have some tweezers handy to grab onto the plunged end. 
  4. Do not try to insert the DMC Memory Thread into a needle for plunging purposes.
  5. Pink Hair Dresser's Tape (or any other kind of low-tack tape) is good to use keeping working legs out of the way prior to securing to the backside of the canvas.
  6. Have someone apply pressure to the surface of the shaped design while you are making the initial securing steps to the back of the canvas. This will help keep the design from losing its shape.
  7. You can successfully apply DMC Memory Thread on top of open canvas work. Just be mindful and mirror the design pathway when securing it to the backside of the canvas.
Here is what the backside looked like as I was designing with the DMC Memory Thread. I placed each element onto the canvas, and then taped it to the backside with Pink Hair Dresser's Tape to keep it out of the way.


Once I was pleased with the arrangement, I removed the tape and began securing the DMC Memory Thread ends.


DMC Memory Thread 6050 White was used for each of the different Cake Tier Frosting Decorations. The bottom Cake Tier was 2 pieces: twisted together and attached to represent the Cable Decoration. The middle Cake Tier was 1 piece: bent into a squiggle design using your fingers; maintaining all segments to be the same height. Tweezers were used to gently pinch the segments together. The top Cake Tier was 1 piece: tied in consecutive Knots. Each Frosting Decoration was placed and tested for best shape before they were permanently attached to the canvas using 1 strand DMC Floss 3865. 


Here is a collection of some of the different shapes used with the DMC Memory Thread. Notice their long "legs" were helpful used for placement and securing to the canvas.


Currently, there are 28 colors. DMC also has a handy chart on their website for selecting the DMC Floss used for couching the Memory Thread in place.


The main thing I learned was to play with and have fun with the DMC Memory Thread. It is a wonderful product. Great for giving your needlepoint a fun 3D effect. I've been told my stitch guide will be available on the DMC website, too. Sweet!


Now, who wants some cake? Until the next time... Hugs, Robin