Showing posts with label 3D Cake. Show all posts

Saturday, July 7, 2012

Ribbons at Woodlawn 2012

Hi Everybody... Robin here.

I have never been to Woodlawn but would love to go. My stitching designs, however, have been to Woodlawn, and won ribbons, too. Many thanks to Lori Mazza from
Waste Knot Needlepoint in Arlington, VA for sharing these photos.

I met Lori (owner of Waste Knot Needlepoint) several years ago when she took my
Katt Z. Witch class at TNNA. Since then, she has taken a few other classes of mine including the 3D Cake class (featuring DMC Memory Thread techniques) and the Fraidy Cat class (from the Creepy Characters by NeedleDeeva).

Longtime blog readers are probably familiar with both of these pieces, but for those new to the blog, here is a more direct link to review:  3D Cake and Creepy Characters.

I recently saw Lori at TNNA/Columbus market and she showed me her photos w/ribbons from Woodlawn. How exciting. Here is a summary from Lori.
Here are the pieces I entered into Woodlawn.  They all were in the commercial multi-stitch canvas category...  
I got a 1st place on the cake and an honorable mention on Fraidy Cat... 
As a shop, we put in 31 pieces for our customers and received 16 ribbons out of 31 entries.  
Congratulations to Lori and all of her wonderful stitchers at Waste Knot Needlepoint.

Let's enjoy her photos:

3D Cake by Associated Talents • CD1200
Stitch Guide by Robin King for DMC
Stitched by Lori Mazza /  Waste Knot Needlepoint

Fraidy Cat by NeedleDeeva • ND 0467-H
Stitch Guide by Robin King
Stitched by Lori Mazza /  Waste Knot Needlepoint

Antique Toy Alphabet by Alice Peterson • 3043
Stitched by Lori Mazza /  Waste Knot Needlepoint

Witch by Susan Roberts/Tapestry Tent • AP-430
Stitched by Lori Mazza / Waste Knot Needlepoint

Love the wooden finishings on Fraidy Cat and the Toy Box? Those were done by Sharon Hall at Mountain Shadow Studio located in Denver, CO. Your needlepoint shop can send your work to them for finishing, too.

Hooty Owl was also stitched by Lori and finished by Mountain Shadow Studio. Don't they make a handsome pair! Lori is certainly ready for Halloween.

Hooty Owl by NeedleDeeva • 0467-i
Stitch Guide by Robin King

Seeing one's stitch guides come into reality...  and winning ribbons... is so thrilling. Thank you, Lori for sharing your work our blog readers.

Until the next time... Hugs, Robin

Sunday, February 5, 2012

3D Cake with DMC Embellishment - part two

Hi Everybody... Robin here.

Sorry to be away so long from the Blog. Since I've been back from TNNA/ Phoenix, I have been working on projects which were shouting my name. Does that ever happen to you? Basking in the warm fuzzy aura of a "job well done" and then life pinches you back into reality. Oh well...

Since this is "mostly" a needlepoint blog, thought I would share the conclusion of the DMC Memory Thread on the 3D Cake from Associated Talents (CD 1200). I had to teach the lesson first to the TNNA students/shop owners. Here's the link to the earlier blog posting. Now that that's done, it is time to share my learned knowledge with you.

The DMC Memory Thread decorated and frosted the cake in 3D style. I used White, Pink, Green for the Flowers/Leaves and Frosting details. I used Gold for the Cake Stand. I followed the design originated by design artist, Alice Okon from DMC, and gave it my own spin, too.


Here are some of the things I learned while working with DMC Memory Thread:

  1. Use a working length of DMC Memory Thread longer than the intended final length. You will want to have "legs" at both ends which will plunge through to the backside of the canvas to be secured.
  2. Pre-shape the DMC Memory Thread before attaching to the canvas.
  3. Use an awl, laying tool or trolley needle to gently open the canvas hole. Have some tweezers handy to grab onto the plunged end. 
  4. Do not try to insert the DMC Memory Thread into a needle for plunging purposes.
  5. Pink Hair Dresser's Tape (or any other kind of low-tack tape) is good to use keeping working legs out of the way prior to securing to the backside of the canvas.
  6. Have someone apply pressure to the surface of the shaped design while you are making the initial securing steps to the back of the canvas. This will help keep the design from losing its shape.
  7. You can successfully apply DMC Memory Thread on top of open canvas work. Just be mindful and mirror the design pathway when securing it to the backside of the canvas.
Here is what the backside looked like as I was designing with the DMC Memory Thread. I placed each element onto the canvas, and then taped it to the backside with Pink Hair Dresser's Tape to keep it out of the way.


Once I was pleased with the arrangement, I removed the tape and began securing the DMC Memory Thread ends.


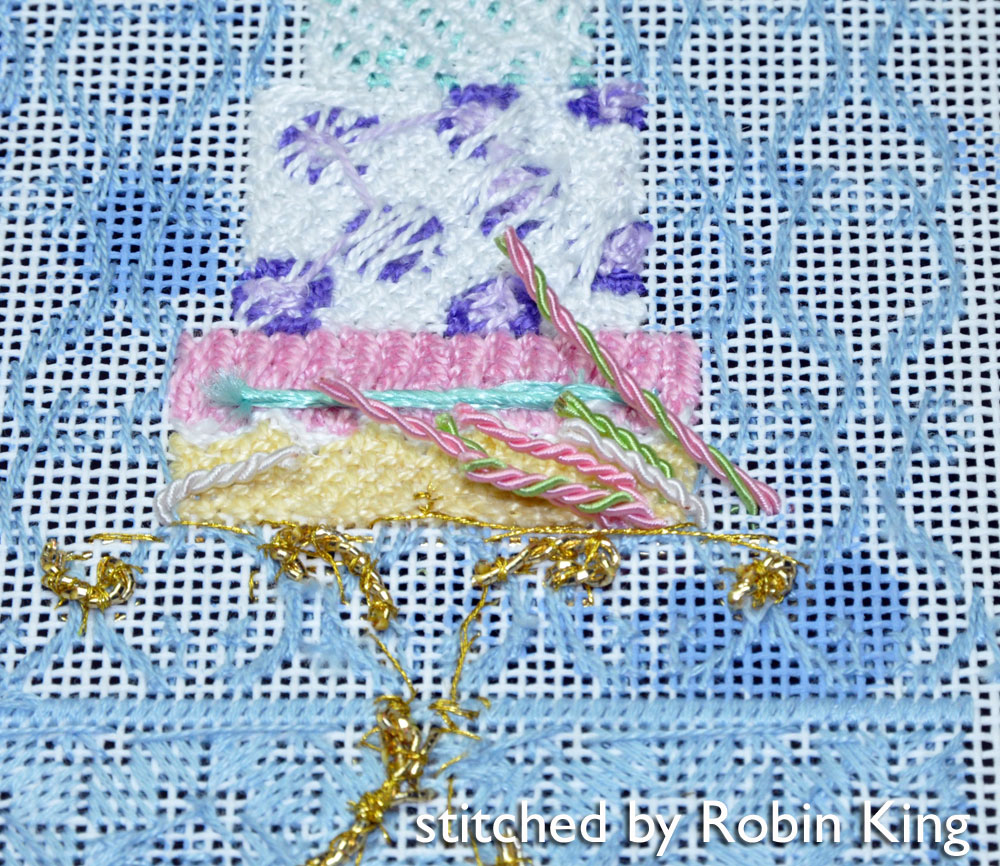
DMC Memory Thread 6050 White was used for each of the different Cake Tier Frosting Decorations. The bottom Cake Tier was 2 pieces: twisted together and attached to represent the Cable Decoration. The middle Cake Tier was 1 piece: bent into a squiggle design using your fingers; maintaining all segments to be the same height. Tweezers were used to gently pinch the segments together. The top Cake Tier was 1 piece: tied in consecutive Knots. Each Frosting Decoration was placed and tested for best shape before they were permanently attached to the canvas using 1 strand DMC Floss 3865. 


Here is a collection of some of the different shapes used with the DMC Memory Thread. Notice their long "legs" were helpful used for placement and securing to the canvas.


Currently, there are 28 colors. DMC also has a handy chart on their website for selecting the DMC Floss used for couching the Memory Thread in place.


The main thing I learned was to play with and have fun with the DMC Memory Thread. It is a wonderful product. Great for giving your needlepoint a fun 3D effect. I've been told my stitch guide will be available on the DMC website, too. Sweet!


Now, who wants some cake? Until the next time... Hugs, Robin

Sunday, January 1, 2012

3D Cake with DMC Embellishment - part one

Hi Everybody... Robin here.

Happy New Year.  I am just amazed how quickly the time has passed. Ready for this New Year? Let's start off with my latest project.

Cake by Associated Talents • CD 1200
Embellishments with DMC Memory Thread
I had been asked to teach at TNNA in Phoenix for the DMC class: 3D Cake Embellishment with DMC Memory Thread. What an honor. I received the canvas (CD 1200) and DMC threads in the mail. What a cute canvas from Associated Talents; part of a scene from their Store Front Bakery canvas (FL712). This canvas design measures 4" W x 6.5" H and is on 14 mesh.  Sweet!


The canvas had already been stitched for the photo posted on the TNNA website, but I wanted to give my own spin to the design.

When I first saw this cake, I also saw a different background for it... I was seeing a "wall" and "floor", too. I studied all of my books and visioned the sweetest "wall paper" design adapted from Julia Snyder's Darn Fillings book. Her stitch is called Confetti Ribbons and is a darning pattern. My stitch is done as a satin stitch and I have called it Mirrored Confetti Ribbons. I like how the curls in the Wallpaper echo the curves on the Cake Stand. Thanks, Julia, for the awesome inspiration.


In my mind, I liked the idea, but I needed to test it out on the computer... just to make sure. Here is a screen shot of the Mirrored Confetti Ribbons. I was liking the look.

Then, I pondered the "floor" design. I was all over the place on that idea. At first, I tried to give it "real" perspective: larger floor pattern in the front and smaller in the back. Good in theory, but not the right idea for this deadline-ladened gal. As the clock was ticking, I shifted my focus and began stitching the Cake Tiers.

After I stitched the Middle Cake Tier, my Eureka moment for the Floor occurred. I had seen a stitch in Ruth Schmuff's Stitches CD Volume 1 which echoed the new Middle Cake Tier design. Her stitch is called Diagonal Stitch with Mosaic. I modified her stitch and now call it Diagonal Stitch with Herringbone Strap. Thanks, Ruth for your wonderful CDs/Books collections of stitches.


Again, I needed to test it out in the computer... just to make sure. Here is a screen shot of the Wallpaper and Floor. Love it. I even added the Wall Baseboard for separation. I was good to go... except... what threads to use?

In my thread kit from DMC, the Perle size 5 was awesome for the Cake. However, in order for the Cake to be the "star of the show"... the Wallpaper and Floor needed to lay back... to really be in the background.


DMC Perle size 8 800 and DMC Floss 800 were the perfect duo for my Wallpaper and Floor. I used the DMC Perle size 8 for the Wallpaper. Easy to use; no laying tool needed. I used 2 strands DMC Floss for the Diagonal Stitch component of the Floor. (Yes, use your laying tool when stitching the Floss.) I used the DMC Perle 8 for the Herringbone Strap component of the Floor. LOVE IT.


Next time I will show the Cake Embellishment ideas. I had so much fun. DMC Memory Thread is my new best friend. If your LNS is attending the TNNA Phoenix Market, ask them to take my class: Friday, 2PM-4PM, FT210. They will learn lots of DMC Memory Thread techniques to share with their customers.

Until then... Hugs, Robin