Pages

Wednesday, September 29, 2010

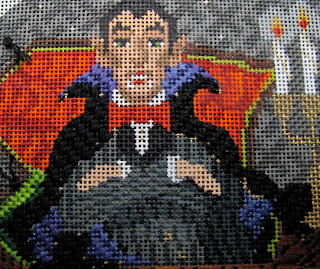
Dr. Acula's face

I 've really enjoyed working on the Dr.'s face and the orange lining of his coffin.  I loved working with the overdyed ribbon.  I didn't worry about laying it straight.  I just worked on keeping it puffy.  Then I tackled the details of his face.  I used a size 24 Chenille needle...small and sharp.  As usual, Amy has provided a great diagram.  I made a slight change.  


See where my laying tool is pointing?  Well instead of taking my stitch into that spot as it is diagramed, I took the stitch straight up to where I put a red dot on the diagram.  If you look at your picture closely, it appears that the top of his lip does not go out as far as the diagram shows.  I hope Amy won't mind me showing part of the diagram  in order to show you what I did.  I followed the diagram at first, but it just didn't look right.


I  have another diagram correction for you.  Diagrams # 11 and #12 are not correct.  These are the diagrams for the side of the coffin and the top of the coffin.  It is a Bargello type stitch which should step down one canvas thread four times, and then it repeats.  The diagrams show the first two stitches stepping down one canvas thread but then skips down two canvas threads for the third and fourth stitch.  It should not do that.  Look carefully at the picture to see what I mean. 


Here is another peek at W. Herr Wolfe.

Tuesday, September 28, 2010

Saturday, September 25, 2010

Peek.

Beware! 

W. Herr Wolfe is ready to come to your homes.

Never one to repeat herself, Amy has created new ways to make pumpkins and borders.  The moon makes a big appearance as W. Herr Wolfe roams in the night.  And of course, Rhett makes his appearance.

Thursday, September 23, 2010

Making progress.


I use to edit videos for a living for FedEx.  I know more about airplanes than I care to know.  Once I did a segment on fan blade blending.  The jet engines suck a lot of air through what look like giant fans.  The blades get dented by stuff, and that effects flight.  I didn't need to know that!

Anyway, I have come to realize that my stitching style is a lot like the way I use to edit videos.  I would lay down the voice and sound track.  Then I would go back and do the special effects.  I liked to quickly do the easier part and that left me more time to work on special areas.  I seem to I have carried this pattern over to my stitching on the Halloweenies.  I attack different areas that I hope to finish quickly so I can spend more time on the special areas. The only problem is that I run out of time each month.  At FedEx, I was known to stay all night to meet a deadline.  But now that I am retired, I am much less disciplined.  So I ask your forgiveness for not finishing each character each month.

I had planned to stitch all day on Tuesday.  But ended up spending the entire day with my husband.  We slept late.  Then we went to Target, then to Best Buy, then to the bookstore, then to TCBY for ice cream.  Then we went to the grocery and came home and made bean burritos.  Then we went for a two mile walk.  Well, try stitching after a day like that.  But it was a GREAT day!

I hope to get more done during our month off.  I plan to set the house aside and continue with the characters in the months we receive a kit for the House.  I am making progress on Dr. Acula.  But where does the time go?


The October E-Newsletter from Amy's will feature some finished Halloweenie characters.  So look for it at the end of next week.  You can sign up for a newsletter alert here.

Have a great weekend.

Monday, September 20, 2010

Dr. Acula's unhappy pumpkin and his cape.


Have you ever seen a more unhappy pumpkin?  As I get ready to do outline stitch for the stem,  I got out some 24 Chenille needle's I picked up at the shop Saturday.  Amy recommends a small sharp needle for outline and stem stitch.  I love the Bohin needles.

Before doing the outline stitches on the unhappy pumpkin's stem, I decided to do the cape.  It's a nice little stitch, but there is lots of compensation.   The stitch also leaves some canvas threads showing.  The black canvas threads don't show, but the gold do.  See the edges of the cape below.


We will be edging the cape with some gold.  I decided to do some black tent stitches so I would have a clean slate, as it were, to lay the gold upon.

That's better don't you think?  Now I won't have to worry about gold canvas threads peaking out.

Saturday, September 18, 2010

Making Progress


I am really enjoying this canvas.  The cat is cute and the rat is cute too. Please follow the chart when stitching the rat.  His little face is different than painted.  Having done the Cat's coffin, the rat and the grass, I moved on to the other single line border.  I'll give the little guy his face tonight.
Have a great weekend!

Thursday, September 16, 2010

Cat Coffin.


I finally had some time to work on the Dr. today.  I stitched the cat and his coffin before I will stitch the top of the big coffin.  I thought it might be easier to compensate around the cat's head.  Of course the cat still needs his face fixed!  I think I will work the pumpkin before the big coffin lid as well.  

I have very much enjoyed Robin's adventures with little Bailey.  Robin, keep sending reports.  He is such a lucky little guy.  We know you will spoil him!

Wednesday, September 15, 2010

He's a little "Houdini"

Hi Everybody... Robin here.

We still call him Bailey but yesterday he was a little "Houdini." Bailey wiggled his Left Leg out of the cast! We immediately took him to see our regular vet. The cast was removed and Dr. Montgomery examined him. Bailey stood on all 4 legs, evenly... without any pain. It was decided to keep the cast off, and to monitor Bailey's activities by keeping him in the large carrier 24/7. He is now a happy camper. He has supervised outings but no climbing, or jumping. We are in his shadow for sure.


I promise I will not monopolize the Needlepoint Study Hall blog with kitten antics. All of your wonderful comments touched our heart. I just wanted to share our good news with you.


On the stitching side of my world, I did finish the Bird and began working on the Worm. Cute canvas, indeed. Thanks, Robin

Monday, September 13, 2010

Robin's TNNA update and Bailey

Hi Everybody... Robin here.

I got my "official" letter from TNNA today. I have been approved for teaching the two new canvases at the 2011 TNNA in Long Beach, CA: Bird & Worm from Zecca, and Harvest Fairy from Melissa Shirley Designs. Time to go into warp-drive-stitching! As soon as their photos are posted on the TNNA website, or once Melissa Shirley mentions her new artist, I will be able to mention these canvases with photos. Until then... Mum's the word!

Instead, in my life, there has been Kitten Drama. For all of you new kitten owners: please heed my experience and avoid the consequences. We found a new kitten. We've named him Bailey. We didn't supervise him and he jumped down from too high. He now has a fractured elbow. Bailey is in a body cast/leg cast. We now feed him, give him water, assist him for the bathroom. Pitiful. Pitiful.


So now I have a new stitching buddy. He's kind of a "captured" audience.... body cast and all. He like my arm gestures and the occasional dangling thread.

Here's a photo of Bailey before his mishap. We named him after Bailey's Irish Cream. We call him Bailey's Wild Irish Kitten.


Well, back to caring for this sweet bundle of kitten; then some stitching when he is sleeping. Thanks, Robin

Saturday, September 11, 2010

Knobs for the coffin, and more.


I will admit that I traveled from one knob to the next with each thread. However, I did a securing L stitch after each knob to keep the second thread tight.  If you do the same, make the L stitch in the gold area where the handles will be.  I didn't figure out that was the best place to do it till I had completed two knobs.   Another case of "live and learn".

The coffin knobs were a three step process.


I stitched the Jessicas loosely to better see the holes, then pressed the treads toward the center when done.  This is a clever three step procedure.  Looks very formal.

I turned the canvas, (and the chart) 1/4 turn for ease of stitching.


Be careful to end the stitching of the side of the coffin in a manner that gives you an "over two" compensation.  See where my laying tool is pointing.  It is a nice clean edge leading into the front area.  Otherwise you will end up with an "over one" compensation on both ends of the area.   That would not be a tragedy, but I think it would be cluttered.


Started with small stitch in Diagram 11.  Then took it out.

I started the next area with the shorter of the two stitches in diagram 11.  Bad move.  See how cluttered it looks?   You guys know that I often leave small errors in and just learn a lesson from it.  But I had to take this out.  See the correction below.


Now doesn't that look better?  It was worth taking out.  

I love how the stitches give the coffin dimension.


So here is the finished front of the coffin, as well as the finished background.  Several different over-dyed cottons were a great choice for the coffin.  The cat's coffin will use yet another 
over-dyed cotton.

Have a great weekend!


Thursday, September 9, 2010

You make us so proud

Hi Everybody... Robin here.

It's a magical time in Needlepoint Study Hall. Linda, from the Stitching Sisters blog, and Melinda, from the Living the Good Life blog, have posted their brand-new-just-back-from-the-finishers-and-wow-they-are-spectacular pieces of the Halloweenies, Stirha Cal-Dron and Frank N. Stein.

Ladies, you make us so proud!

These pieces are fabulous. Wonderfully finished, too.

Please check out both the Stitching Sisters and Living the Good Life blogs. Here's the links:
This is what I love about blogging. Sharing links, progress reports, photos... what a wonderful time.

So, if anyone out there has any progress reports/finished pieces of their Halloweenies, please let us know. We love to brag on you!  Thanks, Robin

Background for Dr.A

Start in the upper right corner.
I started on the background.  I am stitching it in basketweave.  It seems to be more substantial than horizontal tent stitches.  I've got a counting thing going on with it...two, one, two, one, two, one, eight, seven, eight, one, two, one, two, one, two.  That's all it takes to complete one cross.  It will make sense to you when you look at the chart.   (I hope!)

I am tying off my thread after each cross.  I had a mantra going on that went like this,  "should I tie it off or travel, should I tie it off or travel, should I tie it off or travel?".  Then it went like this, " if I travel...which way should I go, if I travel...which way should I go?".  AGH!!!  Just tie it off every time.


Wednesday, September 8, 2010

Just a little time to do a little bit of stitching

Now that I have finished the two bottom borders, I can lay in and couch the single line border.  Once you have laid the threads on top of the canvas, you cannot see the canvas threads to count for the couching spots.  Count below the green border and it's no problem!

Count the threads below the green border to find the couching locations.

Monday, September 6, 2010

Housekeeping on the NSH blog

Hi Everybody... Robin here.

Hope you are enjoying your Labor Day. I've been doing some housekeeping on the Needlepoint Study Hall blog which you will probably enjoy using.

Peggy and I have contributed over 182 blog entries so far since last December. As of today, there have been 119 Halloweenies entries, 40 Haunted House entries, 18 Stirha Cal-dron entries, 21 Frank N. Stein entries, 13 Bride Z. Illa entries, 20 Zomm B. Groom entries, and 14 Dr. Acula entries. There are still three more Characters to come, plus all of the updates from Peggy as she concludes the Haunted House and the current Characters.

Here's what I've done for housekeeping... I've gone through each of the blog entries and labeled them accordingly. All of the Halloweenies have been labeled Halloweenies plus their Kit name of either Haunted House or Stirha Cal-Dron, Frank N. Stein, Bride Z. Illa, Zomm B. Groom and Dr. Acula.
The labels are posted to the right side of the blog and are titled Previous Topics. You can click on the Topics/Label hyperlink, and then all of the entries tagged as such will come up for your reading pleasure.


I believe this will be very useful for our current Halloweenies stitchers and those who join us later. Anyone will be able to see all things Bride Z. Illa, for example, simply by just clicking on the Bride Z. Illa hyperlink. So now as you stitch, even if it's not in time sequence with Peggy, you can see what was said about Bride Z. Illa. I will also do the same labeling for the remaining Characters: W. Herr Wolff, Sarcoph A. Gus, and Dev L. Mann.

I did the same for my contributions, too. I've labeled Katt Z. Witch, NeedleDeeva Heart #150G, Floating Cat, Kitty Bra and Tap Pants, MEOW tote, and the Merry Mobile.

Hope all of this helps. I really enjoyed re-reading the blog entries. Good stuff, indeed. Thanks, Robin

Dr. A's bottom green border

This is the best example of "Ignore the painted canvas" that I have seen in an Amy's stitch guide.  The stitch has absolutely nothing to do with the way the canvas is painted.  But Amy has created a great little three step stitch where anyone else would go with a mosaic or scotch stitch.  It is a fun stitch to do and works up fast.

Here is the green border below the rat. He finally has a body.  He is waiting for some feet and a tail.

I hope you all have a safe and happy Labor Day.  I plan to stitch all day!

Sunday, September 5, 2010

Dr. A's spider webs.


I got my spider webs in on the lower border.  Amy's diagram is just great. Sometimes I would go under a spoke, and other times over.  And I sometimes pierced the thread.  It was fun.    I cut a very long piece of braid...enough to do two webs.  But please tie off between each one.  You may want to go back and stitch one web again and end up redoing two or more.  Use a sharp needle for this.  I used the Chenille size 24.

Funny how I think these little spiders are cute, yet when I see a real one I scream for my husband to come get it.  He always catches them and takes them outside.  He even had a pet spider as a child, till his grandmother stepped on it.  He recalls being a tad upset.  Glad I wasn't there for that one!

Saturday, September 4, 2010

Spiders and more!

My spiders are funky, but at least they don't bite.

Use a sharp needle for the legs and the web, (but not for the spider).  That will let you stitch through the canvas thread, if necessary, to get the placement right.  Not that mine are even or anything!   I used a 24 chenille. It really makes a difference.

I am so amazed at how much better these spiders are than the ones I put on Stirha Cal-Dron.  I don't know about you, but each time I sit down to stitch a raised spider, or any of the spiders, I have to re-learn it.  I whipped out DVD #8, "Spiders and More!".   It really helped me out.

Thursday, September 2, 2010


I worked on the lower blue border yesterday.  Be sure to make a color copy of this canvas.  We will be putting lots of spider things over the base stitch in this area.  Don't forget to stitch over the rat's tail and feet.  Poor thing...I will give him a body tonight.

Wednesday, September 1, 2010

Here we go.


Here is a nice picture of Dr. Acula to use as a reference this month.  
I always keep the picture that comes on the front of the guide handy too.
Isn't he grand.  I especially like his face.