Showing posts with label Tony Minieri DVD. Show all posts

Tuesday, February 28, 2012

Back to Basics DVDs by Tony Minieri

Hi Everybody... Robin here.

One of the many hats I wear is editor/producer of the "How'd You Do That?" needlepoint DVDs. You can see all of the titles listed on the Pet Project Video website.

We filmed Tony Minieri presenting his Back to Basics The Right Way / Bad Habits Broken Here (Level One) lessons. For several years, Tony has traveled and taught his 4-day class material. In DVD format, the Level One series is divided into three parts. Each DVD shows us the right way for improving our needlepoint techniques. Watching these three DVDs will also prepare a student who plans to attend his new upcoming Level Two classes.

My shorthand for these Back to Basics titles are:

  • Level 1 • Part 1 (DVD #9) 
  • Level 1 • Part 2 (DVD #10) 
  • Level 1 • Part 3 (DVD #11)

There are 5 distributors of these "How'd You Do That?" videos: Pet Project Video, LLC, Amy's Keeping Me in Stitches, Norden Crafts, Nordic Needle, and Tony Minieri. You can see their contact information by clicking here on this link. Needlepoint Shops can contact any of our distributors (wholesale orders only) to order these DVDs for their customers.


Back to Basics Level 1 • Part 1 (DVD #9) is 53 minutes long and has 36 chapter markers.

  • Essential Tools:  Tapestry Needles, Chenille Needles, Crewel/Embroidery Needles, The Needle Index
  • Threading the Needle: Threading the Needle x 2, Quilter's Knot
  • Beginning and Ending Threads:  In the Path Waste Knot, Pinhead Stitch, An Away Waste Knot, "L" Stitch
  • Straight Gobelin Stitches:  Brick Stitch, Parisian Stitch, Hungarian Stitch, Double Hungarian Stitch, Sutherland Stitch, Laying Tools, Woven Ribbons, Victorian Step Stitch, Two-Way Victorian Step Stitch
  • Diagonal Stitches: Scotch Stitch, Mosaic Stitch, Tent Stitches, Half-Cross Stitch, Continental Stitch, Basketweave, Scissors, 4-Way Continental, Alicia's Lace
  • Tony's Tenets


Back to Basics Level 1 • Part 2 (DVD #10) is 59 minutes long and has 38 chapter markers.

  • Threads
  • Diagonal Stitches (continued): Cashmere Stitch, Continuous Diagonal Mosaic, Continuous Diagonal Cashmere, Nobuko
  • Line Stitches:  Backstitch, Whipped Backstitch, Outline Stitch, Stem Stitch
  • Crossed Stitches:  Upright Cross, Upright Rice / Jerusalem Cross, Rice Stitch, Double Straight Cross, Triple Leviathan
  • Tied Stitches: Fly Stitch, Lazy Daisy / Detached Chain Stitch, Plain Wheat Sheaf, Steepled Wheat Sheaf, Wreath, Stepped Wheat Sheaf, Rococo Stitch, Rococo - Tony's Preference, Rococo - Amy's Preference
  • Plaited Stitches:  Long-Armed Cross, Van Dyke Stitch, Fern Stitch, Two-Way Fern Stitch, Diagonal Fern / Fishbone, Square Waffle, Diamond Waffle
  • Tony's Tenets


Back to Basics Level 1 • Part 3 (DVD #11) is 57 minutes long and has 25 chapter markers.

  • The Canvas
  • Compensation 
  • Filling Patterns:  Burden Stitch, Double Burden, Composite Couching Pattern, Trellis Pattern, Upright Trellis Pattern: Tying Down the Bars, Upright Trellis Pattern: Tying Down the Intersections, Upright Trellis Pattern: Irregular Area, Diagonal Trellis Pattern: Tying Down the Bars, Diagonal Trellis Pattern: Tying Down the Intersections, Diagonal Trellis Pattern: Irregular Area
  • Knots:  French Knot, Colonial Knot, Wreath (from DVD #10) with Knots
  • Bokhara Couching
  • Canvas Appliqué Traditional
  • Canvas Appliqué Slip
  • Tony's Tenets
View these DVDs like a movie, or search and pause to review the techniques. For each DVD, Tony Minieri is the featured artist, and Amy Bunger is the guest stitcher.

The Tony Minieri DVDs are at the replicators and will soon ship to each of our distributors. I learned so much editing these DVDs... my needlepoint techniques and knowledge have really improved from Tony's lessons.


It's time to make room for the DVDs. Leo, we are going to need that space. He is such a good helper. Until the next time... Robin

Sunday, December 11, 2011

HUGS from Robin - part six

Hi Everybody... Robin here.

Close up of Hugs (GS-11)
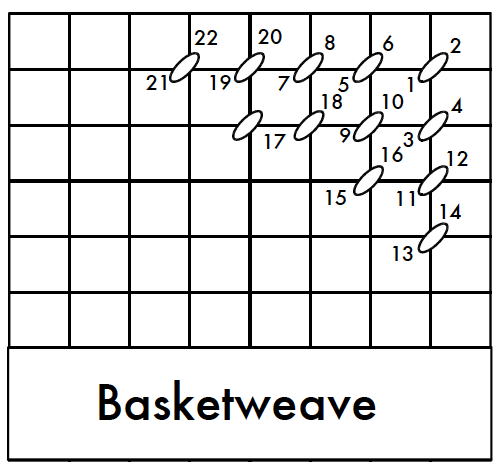
Sometimes a little Basketweave is just what a needlepoint piece needs. A place to rest your eyes, if you will. It's the cornerstone of our stitching repertoire, and yet, we might overlook using it because we are in love with all those other decorative stitches.


In the 1970's, I learned how to do the Basketweave stitch from reading a charted diagram. (True confessions: I began as a self-taught stitcher.) I understood it had a diagonal pathway. Only recently did I realize there was more to that stitch... much more to learn... to do it correctly.

ND 465-A
Stitch Guide by Vicky De Angelis
Last year I was photographing Vicky De Angelis' stitched models for NeedleDeeva. Getting close to her work through the camera and computer, I noticed her beautiful Basketweave stitches.

The Devil is still a handsome guy despite
being at the beginning of Robin's learning curve.
Then, I looked at my stitching. At the time, I was stitching The Devil (ND 0467-B) from the Creepy Characters. Quite a different look for the same stitch. I was keeping the diagonal pathway; what else could I do to improve my technique?

Walk Up the Steps
I had remembered the saying, "Walk up the Steps... Slide down the Poles." In my early stitching days, I heard it, and yet, couldn't/wouldn't process it. I never took time to study the canvas threads: the warp and the weft threads. There was a wonderful charted diagram in The NeedleWorks March 2011 e-newsletter which gave me my "ah-ha" moment. The horizontal steps and the vertical poles were pointed out to me; cue the celestial choir.

At the same time, I remembered Amy Bunger taught a 2-hour class about Basketweave at TNNA. Imagine that... 2 hours on the Basketweave stitch. Currently, I am editing the Tony Minieri DVDs, Back to Basics • Level One, and again, the Basketweave stitch was discussed in depth.

So now, I understand the Basketweave stitch. Here are some points to share with you:
  • Pay attention to the canvas threads: walk up the Steps and slide down the Poles. It really does matter.
  • When beginning a new thread, pay attention to your last stitch and begin the next stitch in the correct sequence. If your begin at the other end, you will get a "striped" look.
  • When ending the thread, do not run it back into the worked area. You will get a "hole" in the stitching. Instead, pull your thread forward so the new thread will have coverage on the backside. 
  • To end the thread, run it either horizontal or vertical along a few stitches; never diagonally.
Backside of Basketweave
Hugs (GS-11) • Gayla Elliott Designs
I am now proud to show you my backside of the Basketweave on the HUGS canvas. I can honestly say this is the first time I correctly did the Basketweave stitch. I am so thrilled. Hopefully, my learned lessons will help someone, too.

Until the next time... Hugs, Robin