Pages

Tuesday, February 28, 2012

Back to Basics DVDs by Tony Minieri

Hi Everybody... Robin here.

One of the many hats I wear is editor/producer of the "How'd You Do That?" needlepoint DVDs. You can see all of the titles listed on the Pet Project Video website.

We filmed Tony Minieri presenting his Back to Basics The Right Way / Bad Habits Broken Here (Level One) lessons. For several years, Tony has traveled and taught his 4-day class material. In DVD format, the Level One series is divided into three parts. Each DVD shows us the right way for improving our needlepoint techniques. Watching these three DVDs will also prepare a student who plans to attend his new upcoming Level Two classes.

My shorthand for these Back to Basics titles are:

  • Level 1 • Part 1 (DVD #9) 
  • Level 1 • Part 2 (DVD #10) 
  • Level 1 • Part 3 (DVD #11)

There are 5 distributors of these "How'd You Do That?" videos: Pet Project Video, LLC, Amy's Keeping Me in Stitches, Norden Crafts, Nordic Needle, and Tony Minieri. You can see their contact information by clicking here on this link. Needlepoint Shops can contact any of our distributors (wholesale orders only) to order these DVDs for their customers.


Back to Basics Level 1 • Part 1 (DVD #9) is 53 minutes long and has 36 chapter markers.

  • Essential Tools:  Tapestry Needles, Chenille Needles, Crewel/Embroidery Needles, The Needle Index
  • Threading the Needle: Threading the Needle x 2, Quilter's Knot
  • Beginning and Ending Threads:  In the Path Waste Knot, Pinhead Stitch, An Away Waste Knot, "L" Stitch
  • Straight Gobelin Stitches:  Brick Stitch, Parisian Stitch, Hungarian Stitch, Double Hungarian Stitch, Sutherland Stitch, Laying Tools, Woven Ribbons, Victorian Step Stitch, Two-Way Victorian Step Stitch
  • Diagonal Stitches: Scotch Stitch, Mosaic Stitch, Tent Stitches, Half-Cross Stitch, Continental Stitch, Basketweave, Scissors, 4-Way Continental, Alicia's Lace
  • Tony's Tenets


Back to Basics Level 1 • Part 2 (DVD #10) is 59 minutes long and has 38 chapter markers.

  • Threads
  • Diagonal Stitches (continued): Cashmere Stitch, Continuous Diagonal Mosaic, Continuous Diagonal Cashmere, Nobuko
  • Line Stitches:  Backstitch, Whipped Backstitch, Outline Stitch, Stem Stitch
  • Crossed Stitches:  Upright Cross, Upright Rice / Jerusalem Cross, Rice Stitch, Double Straight Cross, Triple Leviathan
  • Tied Stitches: Fly Stitch, Lazy Daisy / Detached Chain Stitch, Plain Wheat Sheaf, Steepled Wheat Sheaf, Wreath, Stepped Wheat Sheaf, Rococo Stitch, Rococo - Tony's Preference, Rococo - Amy's Preference
  • Plaited Stitches:  Long-Armed Cross, Van Dyke Stitch, Fern Stitch, Two-Way Fern Stitch, Diagonal Fern / Fishbone, Square Waffle, Diamond Waffle
  • Tony's Tenets


Back to Basics Level 1 • Part 3 (DVD #11) is 57 minutes long and has 25 chapter markers.

  • The Canvas
  • Compensation 
  • Filling Patterns:  Burden Stitch, Double Burden, Composite Couching Pattern, Trellis Pattern, Upright Trellis Pattern: Tying Down the Bars, Upright Trellis Pattern: Tying Down the Intersections, Upright Trellis Pattern: Irregular Area, Diagonal Trellis Pattern: Tying Down the Bars, Diagonal Trellis Pattern: Tying Down the Intersections, Diagonal Trellis Pattern: Irregular Area
  • Knots:  French Knot, Colonial Knot, Wreath (from DVD #10) with Knots
  • Bokhara Couching
  • Canvas Appliqué Traditional
  • Canvas Appliqué Slip
  • Tony's Tenets
View these DVDs like a movie, or search and pause to review the techniques. For each DVD, Tony Minieri is the featured artist, and Amy Bunger is the guest stitcher.

The Tony Minieri DVDs are at the replicators and will soon ship to each of our distributors. I learned so much editing these DVDs... my needlepoint techniques and knowledge have really improved from Tony's lessons.


It's time to make room for the DVDs. Leo, we are going to need that space. He is such a good helper. Until the next time... Robin

Sunday, February 26, 2012

Memphis Pyramid and Needlepoint

Hi Everybody... Robin here.

Beginning a new canvas is so much fun. Planning the stitches. Looking through my thread stash; endless combinations and possibilities. Having a helper named Leo... priceless.


Leo did his part to help me find all of the Red/Pink and Green Threads I might need for the new project. What is my new project, you might ask? Can't reveal it just yet, but please know, it is a wonderful collaboration with Ruth Schmuff. (You can see a sneak peek below.)

Pat (my guy, owner of Business Visuals) was on a photography assignment. I accompanied him and did some stitching while we were driving to the location. The focus of the photo shoot was to show new improvements in Memphis, TN. Pat was documenting the current renovations of the Memphis Pyramid as it becomes the newest location for a Bass Pro Shops.


I like to photograph my current needlepoint along the way. Here's a fun photo which sums it all up.

Until the next time... Hugs, Robin

Tuesday, February 14, 2012

Tea Towels by Glenna

Hi Everybody... Robin here. Today's topic: Tea Towels.

A friend of mine, Glenna Ward, has been stitching Tea Towels for a while. They are decorative and functional... all at the same time. Add your favorite embroidery stitches: French Knots, Backstitch, Wrapped Backstitch, Chain Stitch, Stem/Outline Stitch... to make the cute designs come to life with embroidery floss.

Glenna stitched the Kit Kat Clock. What a great design. It was a purr-fect gift for Vicky De Angelis.


Glenna stitched these Weekday Kittens for me. I just love them. They remind me of our youngest kitten, Lana, who is quite a girly-girl... as far as cats go.


The design patterns and Tea Towels are available at stores such as Hobby Lobby and Hancocks. Iron-on the design, place your Tea Towel in your embroidery hoop, and get ready for creative cuteness. Just imagine what they would look like with threads from your needlepoint stash.

Speaking of cats... look at the new large magnets from Stitchers Inc. They are the same size as the large Flower magnet I purchased recently... about 2 inches. Love the Owl magnet, too. Give Jan a call.


Happy Valentine's Day. Here's a big hug from me to you. Until the next time.

♥ Hugs, Robin

Thursday, February 9, 2012

Needlepoint Study Hall and CraftGossip.com

Hi Everybody... Robin here.

Just a quick update.


Did you hear that Needlepoint Study Hall was mentioned on the February 6th, 2012 posting of CraftGossip.com?

Here's the link:  http://needlework.craftgossip.com/using-memory-thread-in-needlepoint/2012/02/06/

How cool is that!!!  Thanks to Liz Saylor/DMC who gave me the heads up.

Next up on my topic of blogs: Tea Towels. Can't wait to show you. Until then... Hugs, Robin

3D Cake with DMC Embellishment - part four

Hi Everybody... Robin here.

Want to see how/where else to use the DMC Memory Thread? Just look at these ways Alice Okon, designer from DMC, stitched these models using DMC Memory Thread.

Can you find all of the DMC Memory Thread treatments in Photo #1?

Photo #1
Ms. Diva Mermaid / KCN 932 / Kelly Clark Needlepoint 

Alice used it for the different Seaweed locations, Mermaid Bra, Mermaid Bottom, Harp, Braided Trim, Mermaid Crown and Fish Hook.

Can you find all of the DMC Memory Thread treatments in Photo #2?

Photo #2
Ms. Vanity Mermaid / KCN 933 / Kelly Clark Needlepoint

Alice used it for the different Seaweed locations, Mermaid Bra, Mermaid Bottom, Hair Brush, Mirror, Beaded Trim and Mermaid Crown.

Alice also added DMC Memory Thread to this canvas by Maggie Co, Beautiful Flowers (M1429). Look and enjoy! You can also read more about this canvas on the DMC blog.


Need any cute Hair suggestions? Try using DMC Memory Thread for a fabulous 3D effect.

design by DMC
During the 3D Cake Embellishment class, I also brought models I had stitched showing more DMC Memory Thread applications. Remember these?

Movement and Motion really tell the story with DMC Memory Thread.

The Twin Curl decorations at the top of this
ornament was made with DMC Memory Thread.

Use DMC Memory Thread when making
an Earring or Jewelry for your needlepoint.

Lettering, Outline Edge and Facial Details
are easy to do with DMC Memory Thread

Plants and Flowers are enhanced with DMC Memory Thread

To summarize, here are some of the ways I have seen DMC Memory Thread used:

  • ruffle edge or a bow
  • curls - freeform
  • spiral curls
  • flat spirals
  • single line edge
  • double line edge
  • twisted -- one color
  • twisted -- two colors
  • picot needleweaving structure
  • stumpwork structure
  • single knot
  • strand of knots
  • braided
  • beads placed on
  • script wording or letters 

Of course, this is not a final list. I am sure we will find other ways to use it. Can't wait to try. Read more about DMC Memory Thread on the DMC website.

Stop the presses... this just in... I received a wonderful DMC Memory Thread Conversion to Splendor, Silk Lamé Braid, Neon Rays, Soft Sheen Fyre Werks and Mandarin Floss from Sally/Rainbow Gallery. Each thread would make an awesome couching thread with the DMC Memory Thread. Thanks, Sally!


Well, that's all for now. Go have fun with the DMC Memory Thread. Let me hear from you.

Until the next time... Hugs, Robin

Tuesday, February 7, 2012

3D Cake with DMC Embellishment - part three

Hi Everybody... Robin here.

I received permission from DMC, and now I can share the rest of the DMC Memory Thread lesson with you. Get your notepad ready...

During the 3D Cake Embellishment class, I showed the students some wonderfully stitched needlepoint pieces with applied DMC Memory Thread. Everyone was getting comfortable working with it... now was the time to introduce places to use it.

Are you intimidated about where to put the DMC Memory Thread? Here's what I did: make a color paper copy of the painted canvas and get a Sharpie pen. Then, draw lines on your paper indicating possible locations for the DMC Memory Thread.

Plan your pathways with a Sharpie on paper, first.

You can use DMC Memory Thread to outline an area. You can use it as a structure for needleweaving or stumpwork. You can make a 3D design element. You can use it to show movement. It is so versatile. And, there are 28 colors.

Fan Peddler by Labors of Love / LL 270C

Alice Okon, a wonderful designer from DMC, stitched the Fan Peddler from Labors of Love (LL 270C). Her applications were exciting. Just look at all the ways she added DMC Memory Thread to the needlepoint.

Photo #1 shows DMC Memory Thread applied by Alice Okon:
  • the Hat and the Ruffle: nice use of two shades of DMC Memory Thread relating to the painted canvas. The Ruffle Edge is enhanced with the DMC Memory Thread.
  • the Hair: nice use of the DMC Memory Thread showing the Curls of the Hair on top of the Basketweave stitching.
  • the Outline of the Hat Pin: the Silver DMC Memory Thread gives an identifiable edge to the Brooch.
  • the Fan Edges, Doubled Fan Edge and the Collar: these edges are more refined with the application of the DMC Memory Thread. Nice Colors, too.
  • Note: the twisted and coiled DMC Memory Thread into a Purple Rosette on the Green Fan.

Photo #1

Photo #2 shows DMC Memory Thread applied by Alice Okon:
  • the Fan Handles: Picot Needleweaving technique using DMC Gold Or (284 AZ) for the Gold Handle; twisted DMC Memory Thread for the White Fan Handle.
  • the Fan Outlines: keeping true to the painted canvas, the Fan Edges are stitched with DMC Memory Thread.
  • the Fan Embellishments: note there are Beads surrounded by the DMC Memory Thread for detail. Size 8 Mill Hill Beads can be strung onto DMC Memory Thread, as seen on the White Fan Handle.
  • the Basket Edge: is outlined with a single piece of DMC Memory Thread for a nice edge.
Photo #2

Photo #3 shows DMC Memory Thread applied by Alice Okon:
  • the Twisted Edge of the Basket Rim: using two colors of DMC Memory Thread twisted together.
  • the Basket Edge: is outlined with a single piece of DMC Memory Thread for a nice edge.
  • the Fan Edges: double pieces of DMC Memory Thread couched together for the Fan Edge; single piece of DMC Memory Thread used for the curved Fan Edge.
  • the Fan Handles: Picot Needleweaving technique using DMC Gold Or (284 AZ) for the Gold Handle; twisted DMC Memory Thread for the White Fan Handle.
  • the Sleeve Ruffle: the DMC Memory Thread has been used to separate the Sleeve Ruffle placed on top of the Basketweave stitching.
Photo #3

Photo #4 shows DMC Memory Thread applied by Alice Okon:
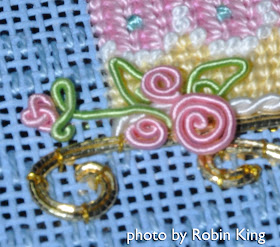
  • the Spiral Roses: the DMC Memory Thread has been coiled and then shaped into Roses.
  • the Green Leaves: the DMC Memory Thread has been shaped into Leaves on her dress as well as on the Fan.
  • the Purple Coiled Rosette: two pieces of Purple DMC Memory Thread (or one long piece doubled then twisted) have been twisted together and then wrapped into a Coil.
  • the Blue Fan Handle: two pieces of DMC Memory Thread were couched side by side for greater size and proportion of the Handle.
  • the Collar: these edges are more refined with the application of DMC Memory Thread.
  • the Green Fan: has Gold DMC Memory Thread for an outline and a Satin Stitch of Gold Thread inside.
Photo #4
 Here are more photos... close up. Photos from Liz Saylor/DMC. Thanks, Liz!


Next time, I will conclude the DMC Memory Thread journey. So much fun is yet to come.

Until then... Hugs, Robin

Sunday, February 5, 2012

3D Cake with DMC Embellishment - part two

Hi Everybody... Robin here.

Sorry to be away so long from the Blog. Since I've been back from TNNA/ Phoenix, I have been working on projects which were shouting my name. Does that ever happen to you? Basking in the warm fuzzy aura of a "job well done" and then life pinches you back into reality. Oh well...

Since this is "mostly" a needlepoint blog, thought I would share the conclusion of the DMC Memory Thread on the 3D Cake from Associated Talents (CD 1200). I had to teach the lesson first to the TNNA students/shop owners. Here's the link to the earlier blog posting. Now that that's done, it is time to share my learned knowledge with you.

The DMC Memory Thread decorated and frosted the cake in 3D style. I used White, Pink, Green for the Flowers/Leaves and Frosting details. I used Gold for the Cake Stand. I followed the design originated by design artist, Alice Okon from DMC, and gave it my own spin, too.


Here are some of the things I learned while working with DMC Memory Thread:

  1. Use a working length of DMC Memory Thread longer than the intended final length. You will want to have "legs" at both ends which will plunge through to the backside of the canvas to be secured.
  2. Pre-shape the DMC Memory Thread before attaching to the canvas.
  3. Use an awl, laying tool or trolley needle to gently open the canvas hole. Have some tweezers handy to grab onto the plunged end. 
  4. Do not try to insert the DMC Memory Thread into a needle for plunging purposes.
  5. Pink Hair Dresser's Tape (or any other kind of low-tack tape) is good to use keeping working legs out of the way prior to securing to the backside of the canvas.
  6. Have someone apply pressure to the surface of the shaped design while you are making the initial securing steps to the back of the canvas. This will help keep the design from losing its shape.
  7. You can successfully apply DMC Memory Thread on top of open canvas work. Just be mindful and mirror the design pathway when securing it to the backside of the canvas.
Here is what the backside looked like as I was designing with the DMC Memory Thread. I placed each element onto the canvas, and then taped it to the backside with Pink Hair Dresser's Tape to keep it out of the way.


Once I was pleased with the arrangement, I removed the tape and began securing the DMC Memory Thread ends.


DMC Memory Thread 6050 White was used for each of the different Cake Tier Frosting Decorations. The bottom Cake Tier was 2 pieces: twisted together and attached to represent the Cable Decoration. The middle Cake Tier was 1 piece: bent into a squiggle design using your fingers; maintaining all segments to be the same height. Tweezers were used to gently pinch the segments together. The top Cake Tier was 1 piece: tied in consecutive Knots. Each Frosting Decoration was placed and tested for best shape before they were permanently attached to the canvas using 1 strand DMC Floss 3865. 


Here is a collection of some of the different shapes used with the DMC Memory Thread. Notice their long "legs" were helpful used for placement and securing to the canvas.


Currently, there are 28 colors. DMC also has a handy chart on their website for selecting the DMC Floss used for couching the Memory Thread in place.


The main thing I learned was to play with and have fun with the DMC Memory Thread. It is a wonderful product. Great for giving your needlepoint a fun 3D effect. I've been told my stitch guide will be available on the DMC website, too. Sweet!


Now, who wants some cake? Until the next time... Hugs, Robin