Saturday, May 29, 2010

Happy Weekend

Hi guys. I want to direct you to a website/blog with a great article on storing our toys: Plays With Needles. Look at her post for May 26th. See how she stores her stuff. Very organized. And great looking stuff.

I saw Robin's MEOW cat in person today. It really looks great. I wish you could see the DMC Memory thread in person. It is just terrific.

I haven't stitched in a couple of days. I plan to work a little on this basketweave project this weekend before I start on the Bride.

Have a great long weekend.

Wednesday, May 26, 2010

EOW ?

Hi Everybody... Robin here.

Well, you know how it goes... my kingdom for 8 more inches. What?!!


You can see I was able to form the E-O-W of the MEOW. So far, so good. I have them loose for positioning. I have not couched them down, yet.

And then... I ran out of the DMC Memory Thread... just when I was needing to create the M. No problem... I purchased more. Yes, the DMC Memory Thread is available at your LNS.

So for those of you following along, I suggest you have 2 of the DMC Memory Thread Black 6020 on hand for this project. Just in case. OK. That's all for now...

For you Halloweenies... embrace the Bullion Knots... embrace the Raised Stem. They are wonderful techniques, and Amy's DVDs will unlock the mystery. Thanks, Robin


Tuesday, May 25, 2010

Celtic Cross and Needlepoint Now

On the second story of the Haunted House you will find this area Amy's is calling a Celtic Cross, (see page 6 of the guide for the second part of the house). It will eventually have three layers of stitches on top, with the first layer being 4 Way Continental. I stitched the 4 Way over the whole area instead of compensating around the middle area. Amy confirmed that this will work just fine as you can still see the canvas so you can do the next layer. So just stitch over the whole thing!

The needlepoint magazine, Needlepoint Now has become a wonderful magazine in the recent past. The current issue has a helpful article about stretcher bars. I will use some of their tips when trying to explain the value of using bars to stitchers who want hold the canvas in hand. Good instructions for tacking your canvas to the bars is included in the article. If you don't subscribe, you local shop may sell it.

I have just learned that I have been putting Evertites together the wrong way ever since I started using them. So Bride Z. Illa will be the first canvas mounted correctly. So far I haven't had any big problems as a result of poor mounting. What was I doing wrong? See the picture below. The frame on the left is correct. The bars are flush on the ends. The one on the right I pushed in too far. Now, I always made sure the frame was square. But if you put them together with the ends flush, you can be sure the frame is square. I tightened the screws just till they pushed against the wood on each bar. Remember to tighten each and every bar the same number of turns each time you need to tighten the canvas.


Happy Stitching!

Monday, May 24, 2010

Tying Up Loose Ends

Hi Everybody... Robin here.

I'm tying up loose ends tonight. What?!! I have added the DMC Memory Thread to the Cat Face. Come look at my madness.

I wanted to share with you my "organized" chaos. I have poked and put in place the Memory Thread for the Cat's Whiskers, Nose and Mouth. The DMC Memory Thread is so dreamy to work with; just have a Laying Tool or a Trolley Needle close by to give you some "pass through" room. Also, have your trusty 1-strand of DMC Floss pre-anchored; ready to couch in place. I did leave them loose so I could bend, tweak or remove as needed for symmetry.

It is my plan and intention to confirm them on the front and secure them on the back. You are seeing the "before" view. Isn't this blogging FUN? Trust me, it looks so CUTE! I will show you the Front Side after I do the MEOW.

Remember, I am on a deadline: the Mewtopia Silent Auction Wine & Whiskers is June 12... the same day I will be teaching Needle Deeva's Heart at Columbus TNNA Summer Market.

OK, back to couching. I will post more progress soon. Thanks, Robin

The end of May

Can you believe another month has passed.  I am still working on the bricks of the Haunted House.  I hope to finish them by the end of the week.  Then all I will have to do to catch up is the raised stem areas.  And there are a lot of them.   But again, no guilt.  I am thrilled I got so much done.  Because, ready or not, the Bride is on her way.  And she is a real beauty.   I have looked over the guide, and Amy's finished product, (pictured below), and I think she will be a tad easier for us to stitch.  She is just as great as Stirha and Frank, but doesn't look as difficult.  So this will be one that we can actually finish in a month...except for when you go on vacation, or to your nephew's wedding, or whatever.  Again, we will do what we can and move on.  These are going to be the best cast of spooky guys you will ever see or have the privilege to stitch.  Just like the Nativity series, it is a classic one-of-a-kind collection!

Whew!  I got carried away.


So, may I introduce you to Bride Z. Illa.

She is half human, half bones but doesn't seem to let that bother her.  She is anticipating a wonderful June wedding.  I love the double wedding ring background.  And see her lovely brides maids at the bottom of the canvas.  They don't have to worry about getting the perfect dress!

So just do a little more work on the Haunted House this week and then enjoy the wedding!

Sunday, May 23, 2010

Mewtopia update

Hi Everybody... Robin here.

I have finished Phase One of my Mewtopia Silent Auction donation needlepoint item. I did find some threads in my Stash for the Eyes and Background. It's wonderful to revisit one's Stash.

Here's what I used: Silk 'n Ivory #167 Sage Brush and Needle Necessities Inc. Spring II 300 for the Cat's Eyes, Silk 'n Ivory #18 Pearl Gray for the Nose, and Petite Sparkle Rays PS39 and PS70 for the remaining spaces of the Background and Cat Face.

Notice the DMC Memory Thread #6020 Black and DMC Floss #310? I will couch them down for the Cat Face details as well as the MEOW words. So far, so good.

Have a good rest of the weekend. Don't forget to catch Amy Bunger (Show #42) on tomorrow's BlogTalkRadio show, Gone Stitching. 2PM Eastern/1PM Central... all episodes are archived for your convenience.

Listen to Gone Stitching on Blog Talk RadioThanks, Robin

Friday, May 21, 2010

Amy's on the BlogTalkRadio

Hi Everybody... Robin here.

Here's a bit of news:
Amy Bunger is going to be on BlogTalkRadio this coming Monday, May 24, 2010 at 2PM Eastern/1PM Central. She will be interviewed by hostess, Renee Seidman from Gone Stitching. It is a 45-minute Internet Radio Show about Needlepoint. Renee has 41 shows under her belt, and Amy's is Show 42.


You can listen live, if your schedule permits; the shows are also archived for your listening pleasure.

Here's the link to BlogTalkRadio:

Remember to look for Show 42 to hear from Amy Bunger.

Listen to Gone Stitching on Blog Talk RadioThanks, Robin

Thursday, May 20, 2010

Batty


When I last reported my progress, my plan was to do a couple of the bats around the chimney and then start the bricks of the chimney. I got carried away and did most of the bats while I was in the groove. I may add some after finishing the piece if it looks like it needs it. It was easy to spread the paper bats with Press 'n Seal out on the canvas and then stitch them one at a time. I have yet to give them bodies and will do so later. The chart Amy provided is great. It allows you plenty options for placement. Now on to the chimney.

Yes, the photo is upside down. That is the only way you can reach that area!

Wednesday, May 19, 2010

Face Off

Hi Everybody... Robin here.

Today I transfered the image of the Cat Face and MEOW design to the 13 mesh canvas. As with most things in life, you've got options.

In the first photo, you can see the paper pattern through the mesh. I used a mechanical pencil to trace the design on the canvas.

You can also tape your design/canvas onto a window and trace using the natural light. If you have a light box, you could use that as well. If you do need to erase, be sure to use a White art eraser.

I did use a faint, light touch. I also made a mark on the canvas to indicate where to place the first stitch. I began stitching in the Cat Face.

So far I have chosen Silk 'n Ivory Natural and Silk 'n Ivory Sacré Blue 114; they complement the Canvas Tote quite nicely. I will look into my stash for the eye threads... shouldn't be a problem. Thanks, Robin

Tuesday, May 18, 2010

Kidnapped!

Once a month the employees of Amy's Golden Strand meet on a Monday night to discuss business and schedules and stitches.  Well, we pulled a good one on Amy Monday night.  After a brief meeting we kidnapped her and took her out to a swanky restaurant for her birthday.  She quickly realized that being kidnapped by ones employees can be a good thing.  We dropped her car off at her home so she could have a cocktail or two without worrying about driving.  We had a great time.


Left to right you see, Candy, Peggy, Amy, Eileen, Judy, Robin, Jill


Happy Birthday Amy!

Measure Twice... Stitch Once

Hi Everybody... Robin here.

What's that saying? Measure twice ... cut once? Well, it applies to Needlepoint, too.

The Canvas Tote called for a 5" x 5" insert area, and I designed the Cat Face & MEOW accordingly. Then I printed a paper pattern as a preview. OOPS, was I off.

You can see the Cat face was too close to the bottom Blue Border. I'd like a little more breathing room. Good thing I checked and double checked before stitching. Today I resized the Cat Face a wee-bit smaller, but I kept the MEOW in the same location.

I took the photo on the deck. Today was a perfect day in Memphis: moderate temperatures in the 70's. Elliot heard I was stitching for Mewtopia's Wine and Whiskers Silent Auction. He posed for a photo.

Well, next time I will show how I transfered the design. Thanks, Robin

Sunday, May 16, 2010

One Mewtopia donation: coming up!

Hi Everybody ... Robin here.

I received my letter in the mail yesterday from Mewtopia.
What's Mewtopia you might ask?

"Mewtopia Cat Rescue is a Tennessee non-profit corporation established in May 2000. We provided a sanctuary for homeless, abused, abandoned or owner-relinquished cats and kittens until they can be placed in a secure, loving environment.... On Saturday, June 12 2010, we will be hosing the 9th annual Wine and Whiskers silent auction on the grounds of Mewtopia at 734 Mt. Moriah, Memphis, TN 38117. We would greatly appreciate your participation in our event. Your donated item or gift certificate would be a wonderful addition to our auction items, and no gift is too small... Thank you for your support and consideration. If you have any questions, please contact us at (901) 387-1464 or visit our website at www.mewtopia.org."

I have been gifting my crafted services to this cause over the past few years. For those of you who don't know, my first passion was Stained Glass. I taught for years at a local Stained Glass store, and have made windows, lamps, picture frames, kaleidescopes, stepping stones, yard art... you name it. Here's a photo of the Stained Glass Votive Candle Holder and Stained Glass Picture Frame Holder I made for one of their Silent Auction event.


This year I wanted to make a needlepoint item. I've had an idea in the back of my head, and now I've given myself permission to make it with their June 12th deadline. Remember, I am the kid who had to get the chores done before playing.

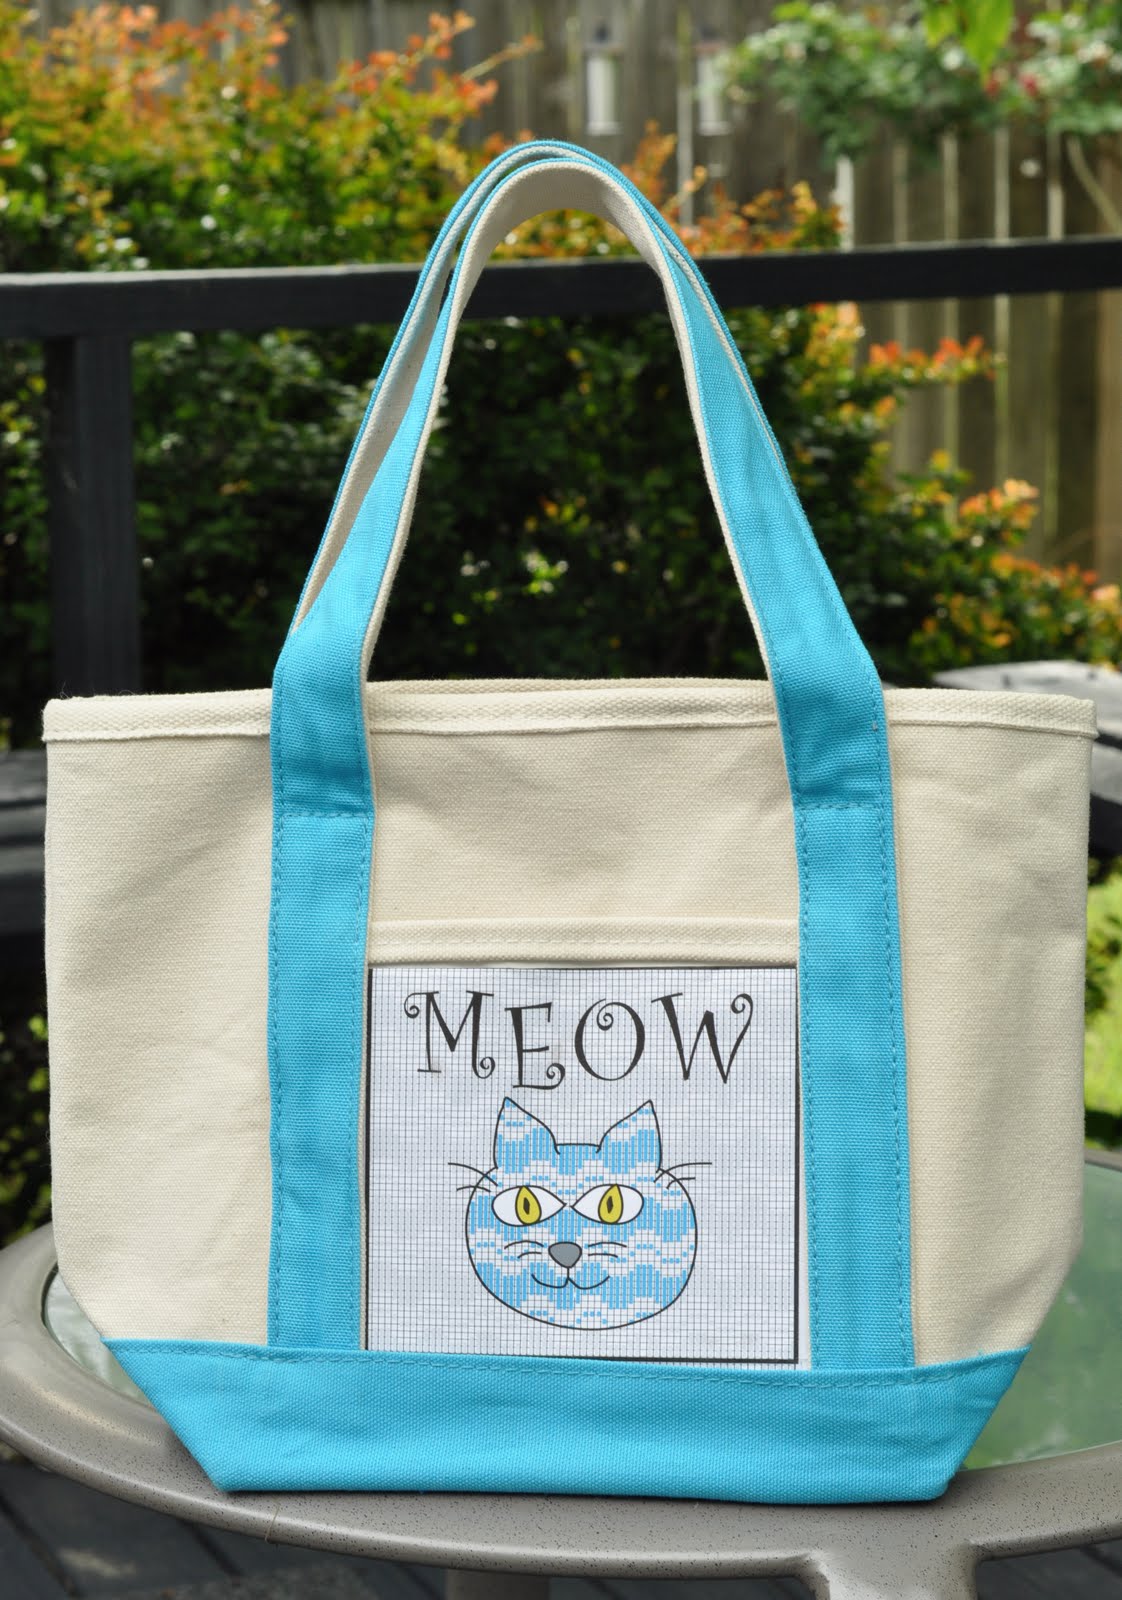
I am going to purchase one of the Canvas Totes from Amy's. I know you've seen them... the canvas kind with colorful trim. I'm going to select the size for a 5" x 5" insert. Here's the photo.


Then, on 13 mesh canvas, I am going to stitch this design. Pat Ryan, my guy (cat lover, owner of Business Visuals Photography and 1/3 owner of Pet Project Video, LLC) designed the cat, and I added the stitch concept in the CanvasX stitch program.

Here's the preview of the diagram. I am planning on using the DMC Memory Thread for the MEOW words as well as the Cat Face outline.

We have adopted 2 cats from Mewtopia: Elliot and Jules. They are the best cats, ever!

It is my honor to stitch an item for the Mewtopia Silent Auction. I will blog about its progress, and the finished results. Here's a photo of Elliot and Jules. Thanks, Robin

Nice day

Hi guys.   I have no pictures today.  I left my camera at the shop.  I took a few pictures of the Cook-Up class to share with you later.  What a fantastic group of women are in this weekends class.  All skill levels, all conferring with each other and having a great time.  It was amazing watching Amy in action.  She shares so much information.  She does not sit down all day. (Except to help each person at their canvas.)  I will post the pictures this week.

I have just finished the stone chimney trim and cap.  (Page 4 of guide, diagram 7.)  I stitched two layers of the satin to give it some dimension.  I hope to do the satin stitch of the  Cupola stone roof next , (page 5, diagram 9a).  After studying the canvas with the raised stem stitch in mind, I think this roof would be a good place to get comfortable with the raised stem stitch.  But I will do the bricks next.  I am planning for a few bats to overlap the chimney bricks as Amy did.  (See the picture.)  So I will stitch those bats before I stitch the chimney bricks.  Make sure not to cut up the master sheet of bats!  Make a few copies of it and save the master.

Have a great week.

Friday, May 14, 2010

Just another pretty face.


Here's the moon.  You definitely have to turn the canvas, (and chart), upside down to do this.  It's gives the moon quite a personality.  I'm going to do the bricks next.   Any advice out there?

Thursday, May 13, 2010

Door done


Did the door yesterday. Never got out of my PJ's. How decadent.

Worked at the shop today. Some of the ladies who are attending Amy's Cook-Up this weekend arrived early. It is always so much fun to see how excited they are. They are going to have three days to stitch, eat and have fun. There's a great variety in the canvases that will be stitched this weekend. I get to see the progress when I work the shop on Saturday. There are still some openings in the fall Cook-Up classes. Call the shop to sign up.

I hope to work on the Moon tonight. Glitter anyone?

Wednesday, May 12, 2010

Raised Stem reminder


Hi Everybody ... Robin here.

I wanted to mention (yes, another shameless, yet useful plug) that you can refer to Amy's DVD #8, Spiders and More! for a video tutorial about doing the Raised Stem technique. Amy even has a segment on how to do the "Left-handed Raised Stem Technique."

So... with Amy's charted stitch diagrams, her photos, her DVD and Peggy with the Needlepoint Study Hall, the Raised Stem should be very manageable to do. OK, everybody... Relax. Breathe.

It's a very useful technique.


This photo is of a Raised Stem Pumpkin that I did on the Tall Sickly Green House from Melissa Shirley Designs. Isn't he cute!


This photo is of a Raised Stem Wheel on the Halloween Cat Pull Toy from Melissa Shirley Designs. Very effective, indeed.

Well, hope this calming moment helps. Let us know how it goes for you. Thanks, Robin

Tuesday, May 11, 2010

Ghost Window

 
Hi!  I finished the windows.  The last one I stitched was the second story window with a ghost.  Be careful not to stitch over the post, (laying tool is pointing to it).  And be sure to stitch over the gray tail of the ghost.  I found that if I changed thread in the middle of a row on all of the windows, it really showed.  So just plan to finish a row rather than changing thread in the middle.

Monday, May 10, 2010

lower floor windowpanes...and no guilt!


I finished the other downstairs windowpane and the one in the door tonight.   A little bit every day will get us closer to the finish.  I have been worrying about the fact that I am not finishing each figure in the month I received it.  I have a new plan.  I will do as much as I can in the month I receive a character.  I will put it aside at the end of the month when the next character arrives.  I will continue this throughout the year.  Then in 2011 I will return to each canvas in its given month and hopefully finish it!  What do you think?  I just can't keep beating myself up about it.  This way I will enjoy each canvas and not feel guilty.

Sunday, May 9, 2010

Windowpanes

I thought I would never finish these two windowpanes.   So much for finishing all of the windowpanes today.  As usual, Amy's choice of threads and stitch are very effective.  It really looks like glass.

Saturday, May 8, 2010

Haunted House window preparation


I've completed stitching the window frames and the areas under the arches.  I took Amy's tip of using just one thread, (the Sampler thread), for the areas under the arches.  It will probably be covered by the wonderful arches we will build.  I am saving the arches for last.  I'm afraid I may get bogged down with them like I did with Frank's pants and not make good progress.


Each window is a little different.  You are preparing them for the stone arches, so you should complete the framing first.  The small window in the center of the house, (pictured below), is totally covered with a stone arch, so only stitch the ledge and center frame of the window.
Tomorrow I will complete the window panes and maybe the moon.

Friday, May 7, 2010

Third floor window with the ghoul in the striped coat


I asked Amy about this window as I was not sure how to stitch the top part of the bottom ledge. I want to share the information with you. You need to stitch over two threads covering the brown line. The raised stem ledge will fit under it.


Stitch a couple of rows of continental, (with three strands of the thread listed in the guide), under the arch with the same thread used for continental on the sides. The bottom of this arch is not specifically painted for the small leaf-shaped points at the bottom tips. Just leave enough room to do one on both sides.

On all of the windows, do one row of continental on the sides of each window, (three strands), and two or three rows of continental under the arches. Amy suggests doing an extra row under the arches so there is no chance of blank canvas showing under the arches we will build on the top of each window.

If you are working on the bricks, check out the comments/tips under Glitter Glue posted on May 5th.

Have a great weekend.

Wednesday, May 5, 2010

Glitter Glue


Boy what a nice pop to the moon.  The Glitter Glue is super easy to smear or brush on.  I did a practice run and then painted the moon.  I'm not sure if we are to put glitter over the whole moon or not.  I just did the inside of the darker circle line.  We can add to the border later.  Super easy.  Give me something else to glitter!

Tuesday, May 4, 2010

Bricks on the bottom of the Haunted House


It appears that some of our canvases of the Haunted House were painted differently than Amy's.  If you look at the pictures that came with this months kit, you will see that the bricks end with the sides of the house on Amy's canvas, (picture on left).  Your canvas may not match.  The bricks go all the way out to the end of the painted canvas on Nancy's canvas, as well as mine, (picture on right).  Amy has offered a couple of solutions for us.

"There are two choices that I see  - - stitch it as painted and not worry about it. The viewer won't notice, just like none of us noticed until she started to study the individual pieces of the painting. The other option is to stitch heavier bushes in that area to cover the painted porch. She could build up some bushes on the opposite end to match if she wants. I am not planning on a thick coverage for the bushes so she would need to work them as if they were separate bushes."
Amy


I think I will stitch it as painted.  The bricks are nice and I would rather do more bricks than more bushes.  I don't know why!  

I didn't get to the glitter glue tonight...maybe tomorrow.

Happy stitching!

p.s., I saw Robin's class piece in person today.  OMG.  It is perfectly stitched with beautiful stitches.  She really has a talent for choosing the best stitch for every area.

Monday, May 3, 2010

Haunted House window tips & Glitter Glue

The directions for the window frames are on page 3 of the guide.  It is best to stitch the window frames before the window glass so you have a place to bury threads.  These window frame directions are for the lower part of the windows only.  The upper window areas where you see my BLT pointing to is covered on page 7 under STONE ARCHES OVER DOOR & WINDOW.  There is some brown edging right under the white arches. Even though I read the guide twice, I almost covered those upper window areas with the window frame thread.  Go read the Stone Arches directions before you do the window frames so you understand how it all works together.


And here is the Glitter Glue for the moon.  I hope to spread that gold glitter on the moon tomorrow night.


Robin is teaching this canvas at Columbus TNNA Summer Market


Hi Everybody... Robin here.

Well, I finished it. What's it? My wonderful class piece from Needle Deeva. I have nicknamed it the Columbus Heart, but officially it is #150G in the Needle Deeva line. This canvas will be released at the June 2010/Columbus TNNA Summer Market. Lucky you... here's a preview.

I will be teaching this canvas & stitch guide to 20 Shop Owners during the TNNA Summer Market on Saturday, June 12, 2010. So far, 11 people have signed up; 9 seats still available. If you are a shop owner, or, if your LNS is going to the TNNA Columbus Market, consider taking my class. Judee from Needle Deeva is a sweetheart, as well as a fabulous canvas designer. This canvas is one of a new series of Hearts. Love it! ♡

The canvas is on 18 mesh, and will have a finished size of 4⅜" W x 6⅞" H. Fits into the Stirling Bag Self-Finishing products. I'm going to use the Black Shoulder Bag. Won't that make those colors POP! This canvas will be available from Needle Deeva with my Stitch Guide through your LNS this June. That's next month!

I stretched my mind and came up with new techniques: challenging, but not too challenging. Beads, Ribbons, and the wonderful Kreinik Holographic Braid were used. Awesome threads from Rainbow Gallery, DMC, ThreadWorX, River Silks, and Mill Hill were used, too. Did I already mention I had fun stitching this canvas? The Stitch Guide has been written. The Thread donations have been submitted. This evening I took its official PHOTO.

What an exciting time I have had! Thanks for letting me share my new NEWS with you. Robin

Saturday, May 1, 2010

Begin House Part Two

I can't believe it is May already.  I am going to put Frank on the shelf and get going on part two of the Haunted House.  I am using my new frame stand from K's Creations.  It clamps on both sides of the canvas.  The Evertite stretcher bars are quite heavy, so this set up is better than a clamp on one side only.

I have read through the guide a couple of times and have a game plan.  That includes not getting bogged down like I did with Frank's pants.  I plan to work everything I can before doing the raised stem areas, and there are a lot of them.  There are the windows and the bricks to do.  Amy has picked out some great new overdyed threads for us to use on the bricks, as well as an interesting stitch.  And there are the bats...lots of bats.

And this guide is FULL of tips.  Great tips.  I will share one that is universal so those of you who are not stitching Halloweenies with us can use it.

Amy says,

"When a straight stitch meets a slanted stitch on a needlepoint canvas, there is always a decision to be made. Do I work the straight stitch and cover part of the slanted stitch next to it or do I not work the straight stitch and leave a tiny bit of canvas showing?  The decision breaking question is, "Who owns the line?"  In other words, which object is in front of the other?  If the straight stitch is on the object to the front, then, yes, stitch it to slightly cover the slanted stitch.  If the straight stitch is on the object to the back, then, no, don't take that last stitch; leave a tiny bit of canvas showing."

Blog Archive